|
| Author | Thread |
|
|
12/16/2016 10:39:26 PM · #1 |
I may get the chance this weekend to shoot some Roller Derby. The venue is a typical indoor gym and it's a fairly high speed sport. Does anyone have any suggestions on settings that I should try on my camera to try to get good shots with not exactly high-end equipment? I'm thinking maybe the 28-90mm lens with a higher ISO. Ideas, thoughts? Also, recommendations of reasonably priced lenses for future such occasions are welcome too. Thanks!
Currently using a Pentax K-50 with these lenses:
Sigma 28-90 3.5-5.6
Sigma 100-300 4.5-6.7
Pentax Prime 50 1.8
|
|
|
|
12/17/2016 04:50:49 AM · #2 |
You will have to tailor the following to suit your specific needs. I wrote it for my daughter when they had the opportunity to shoot a college ice hockey game for the first time. Given the similarities (fast-paced, poorly-lit, indoor action with lots of movement and physical contact), much of the following is relevant.
FWIW, they shoots with a Canon Mark IIn with either a Canon 70-200 f/2.8L IS USM or a Canon 24-70L USM.
Originally posted by skip:
You�re going to have a blast!
Shooting hockey is a challenge: bad light and fast action. But, if you stay focused, you�ll be fine.
Simple goal: 20-30 good photos. You might have to shoot 500-600. You can�t overshoot. Take plenty of cards.
Settings:
TV mode: iso800 and shutter speed 1/320.
AV mode: iso800 and aperture f/2.8
The biggest problem is that the glass around the link is pretty scratched up and if you don�t keep your lens up close to it, or touching, you can get bad reflections.
If you put your lens up to the glass, be ready to jump back because players crash into the wall all the time. That glass is flexible to keep from hurting the players when they hit hit, but that also means that it can bend right into you, even if you aren�t touching it. Be mindful.
The best place to shoot is in the team's box because there isn�t any glass. You just have to pay attention so as not to catch a puck in the face.
Also, try to get some shots from behind the goal cage.
Look for peak action, when bodies collide, when players knock someone off their feet.
Try to follow the puck, but also spend time following each individual player until you think you have a good shot or two of each player.
Face-offs are always good action.
Look for high emotion (especially after a score).
Look for players yelling and cheering.
There are 3 periods. Use some of the in-between time to review and field delete images that don�t work.
Take a scarf. I�m not kidding. It�s easier to take stuff off than to not have it and need it.
There is a LOT (I mean A LOT) of construction on I-64, so allow some extract time to get there. And be sure to park in a well-lit spot.
Get there early enough to shoot them warming up so you can start to get an idea as to what to expect at game time.
Look at these to get an idea of what you�re looking for:
https://www.google.com/search?q=college+ice+hockey+action+photos&num=50&tbm=isch&tbo=u&source=univ&sa=X&ved=0ahUKEwi4gPeSgZLQAhXp6oMKHQxpDCEQsAQIHA&biw=1728&bih=788
Go to the team's website to see what they've gotten before.
Do be careful; as long as you pay attention, I�m sure you�ll do fine and have fun!
Part II
Just a few more, important tips
1) Whenever I shoot some place or something for the first time, I find out where I can and cannot go. Since you are there for the team, you are basically �with the team� and should be able to go wherever they go.
2) Connect with the coach as soon as you get there.
3) Never shoot an entire event from one place. Try out as many places as you can until you find 3-4 that work for you, that will give you a good, interesting perspective.
4) I know sometimes all that equipment gets pretty heavy and tiring to lug around. As the 70-200 is going to give you the best shots, I would suggest using it in the 1st and 3rd periods, and using the 24-70 during the 2nd period.
5) Even if you�re invited or tempted, don�t go out on the ice with a camera. One slip and that gear is toast.
6) Don�t forget to get some feature photos of sticks, gloves, pucks, helmets, and skates. In addition to action, look for player candids, especially interaction between 2 or more players.
7) Shoot like you own the joint. Just be safe and aware.
8) DO THIS: In TV mode: shutter speed 1/80. Pan skating players! It takes practice, but will produce some absolutely amazing killer shots (see attached from last weekend).
9) Shoot like this is a major, one-time portfolio assignment. Just get in the moment and make it yours. Look, see, and shoot.
10) Do review your shots as you shoot to make sure your settings are getting you decent, acceptable exposures. If you are running into any problems, CALL ME! I am here to help and you are not expected to be a fully-polished professional action sports shooter.
11) Lastly, believe in yourself! You CAN do this and you CAN have fun!
Ps: Make sure both your batteries are charged and take your charger with you just in case.
|
While I know nothing about your gear or its capabilities, I'm sure you'll be able to figure it out and will do just fine. Just pay attention as you go along, making adjustments as necessary.
Good luck, and have fun!
Message edited by author 2016-12-17 13:00:19. |
|
|
|
12/17/2016 07:52:59 AM · #3 |
|
|
|
12/24/2016 05:31:59 AM · #4 |
Originally posted by Skip:
You will have to tailor the following to suit your specific needs. I wrote it for my daughter when they had the opportunity to shoot a college ice hockey game for the first time. Given the similarities (fast-paced, poorly-lit, indoor action with lots of movement and physical contact), much of the following is relevant.
FWIW, they shoots with a Canon Mark IIn with either a Canon 70-200 f/2.8L IS USM or a Canon 24-70L USM.
Originally posted by skip:
You�re going to have a blast!
Shooting hockey is a challenge: bad light and fast action. But, if you stay focused, you�ll be fine.
Simple goal: 20-30 good photos. You might have to shoot 500-600. You can�t overshoot. Take plenty of cards.
Settings:
TV mode: iso800 and shutter speed 1/320.
AV mode: iso800 and aperture f/2.8
The biggest problem is that the glass around the link is pretty scratched up and if you don�t keep your lens up close to it, or touching, you can get bad reflections.
If you put your lens up to the glass, be ready to jump back because players crash into the wall all the time. That glass is flexible to keep from hurting the players when they hit hit, but that also means that it can bend right into you, even if you aren�t touching it. Be mindful.
The best place to shoot is in the team's box because there isn�t any glass. You just have to pay attention so as not to catch a puck in the face.
Also, try to get some shots from behind the goal cage.
Look for peak action, when bodies collide, when players knock someone off their feet.
Try to follow the puck, but also spend time following each individual player until you think you have a good shot or two of each player.
Face-offs are always good action.
Look for high emotion (especially after a score).
Look for players yelling and cheering.
There are 3 periods. Use some of the in-between time to review and field delete images that don�t work.
Take a scarf. I�m not kidding. It�s easier to take stuff off than to not have it and need it.
There is a LOT (I mean A LOT) of construction on I-64, so allow some extract time to get there. And be sure to park in a well-lit spot.
Get there early enough to shoot them warming up so you can start to get an idea as to what to expect at game time.
Look at these to get an idea of what you�re looking for:
https://www.google.com/search?q=college+ice+hockey+action+photos&num=50&tbm=isch&tbo=u&source=univ&sa=X&ved=0ahUKEwi4gPeSgZLQAhXp6oMKHQxpDCEQsAQIHA&biw=1728&bih=788
Go to the team's website to see what they've gotten before.
Do be careful; as long as you pay attention, I�m sure you�ll do fine and have fun!
Part II
Just a few more, important tips
1) Whenever I shoot some place or something for the first time, I find out where I can and cannot go. Since you are there for the team, you are basically �with the team� and should be able to go wherever they go.
2) Connect with the coach as soon as you get there.
3) Never shoot an entire event from one place. Try out as many places as you can until you find 3-4 that work for you, that will give you a good, interesting perspective.
4) I know sometimes all that equipment gets pretty heavy and tiring to lug around. As the 70-200 is going to give you the best shots, I would suggest using it in the 1st and 3rd periods, and using the 24-70 during the 2nd period.
5) Even if you�re invited or tempted, don�t go out on the ice with a camera. One slip and that gear is toast.
6) Don�t forget to get some feature photos of sticks, gloves, pucks, helmets, and skates. In addition to action, look for player candids, especially interaction between 2 or more players.
7) Shoot like you own the joint. Just be safe and aware.
8) DO THIS: In TV mode: shutter speed 1/80. Pan skating players! It takes practice, but will produce some absolutely amazing killer shots (see attached from last weekend).
9) Shoot like this is a major, one-time portfolio assignment. Just get in the moment and make it yours. Look, see, and shoot.
10) Do review your shots as you shoot to make sure your settings are getting you decent, acceptable exposures. If you are running into any problems, CALL ME! I am here to help and you are not expected to be a fully-polished professional action sports shooter.
11) Lastly, believe in yourself! You CAN do this and you CAN have fun!
Ps: Make sure both your batteries are charged and take your charger with you just in case.
|
While I know nothing about your gear or its capabilities, I'm sure you'll be able to figure it out and will do just fine. Just pay attention as you go along, making adjustments as necessary.
Good luck, and have fun! |
The following post is just perfect. |
|
|
|
12/24/2016 11:42:33 AM · #5 |
| Almost makes me want to go to a hockey game :) |
|
|
|
12/24/2016 12:07:47 PM · #6 |
Originally posted by Tumbleweed:
Thanks! |
Hi Kimberly - hope your Roller Derby shoot went well! You may not know this, but Skip is one of those DPC success stories - he's done some pretty awesome things. :-) Skip is also one of those people that always has a friendly smile and sensible photography advice for those that seek it. If you haven't already, check out some of his work (link on his profile page). |
|
|
|
12/26/2016 11:58:21 PM · #7 |
One thing I have found is that many arenas, gyms, etc... the lighting can be very inconsistent. I have found using auto ISO very helpful in these places, as one particular setting may not work in different areas. Don't be afraid to shoot with high ISO, it is pretty much a must when shooting indoor sports, especially when you aren't using fast lenses. Clean up the noise in post as best as you can, the noise is preferable to blurry (unless you are purposely going for motion blur).
It also means that you can take advantage of it when you take different types of shots, sometimes capturing emotions during stoppage or little motion means you can dial your shutter speed back, using auto ISO will automatically adjust so it's one less thing you have to worry about. Just dial it up again for action. Considering that neither of your zooms has constant aperture, you will likely want to shoot manual at the largest aperture (which will change as you zoom in/out) and only adjust the shutter speed, and let the auto ISO handle the rest.
The fact is, this type of shooting is where you will test the limits of your gear, I am not familiar with your camera, but you might also run into AF problems in low light, not to mention that a lot of cameras don't have fast tracking capabilities for fast sports even in good light. |
|
|
|
12/27/2016 04:25:50 AM · #8 |
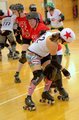
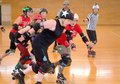
So it went pretty well. I shot about 1800 pictures and ended up posting 168. I started with my zoom lens but the ISO went really high (up to 25600) with the aperture set to full open depending on the zoom level and the speed around 1/320 and I have no idea how to fix that post processing. I then switched to my prime lines 50mm/f1.8/1/320s and the ISO came down to a reasonable level (400-800). I was able to crop in and get better results with the 50mm then with the 90mm full frame. Although I really want a new lens now! I also did manual white balance trying to get them to look less yellow, which I think helped some. Finally, I found a setting that let you take a picture despite the autofocus hunting, and while it resulted in a couple of pics out of focus, it was a great improvement from when it would hunt and I couldn't take the picture even though it was already in focus. Thanks for the advice, I definitely kept it in mind. Here's a couple of the action shots.
Message edited by author 2016-12-27 04:27:42. |
|

|
|
Current Server Time: 04/18/2024 03:13:30 AM  |
Home -
Challenges -
Community -
League -
Photos -
Cameras -
Lenses -
Learn -
Prints! -
Help -
Terms of Use -
Privacy -
Top ^
DPChallenge, and website content and design, Copyright © 2001-2024 Challenging Technologies, LLC.
All digital photo copyrights belong to the photographers and may not be used without permission.
Current Server Time: 04/18/2024 03:13:30 AM EDT.
|


