| Author | Thread |
|
|
03/25/2022 08:59:12 AM · #1 |
Ok, I've been wanting to ask for quite awhile, and now seems the perfect time with high key approaching. I'll use a recent challenge entry and and entry of my son's. And I'm hoping to find a couple more examples.
Working with a white background is really problematic for me. Sometimes if the white are just a tiny bit off, they show as grey patches on different monitors.
Here's a prior iteration. The background isn't a pure white, but is a perfectly acceptable range of greys on my good monitor. On my other monitor, it looks blotchy.

I thought I had more examples, but couldn't find them. So using someone else's photograph from work. The one looks ok on the good monitor. Not great, but acceptable. On that bad monitor, there's bluish grey blotch directly below the pendant and in some other places that look awful.

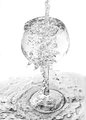
On my water glass shot, some grey in the background was ok, because blowing all the white made the glass itself too blown, and blowing just the background make the glass and water too dark. It was awful working with it.
I've taken to adjusting on my good monitor, and then bringing it over to the bad one to check and modifying yet again to find something that works on both.
How do you avoid the stupid blotchy grey problems in high key and white backgrounds?
Also, how do you deal with white in general?
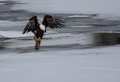
One other example. Jesse took this shot, and I didn't think it would do that well, because it looked a bit underexposed on my good monitor even though it's a spectacular shot. When I brought it to my bad monitor, it was severely underexposed. Yet when I voted on my ipad, it look great!
How do you deal with whites? Especially when you know that people's monitors are all over the place?
|
|
|
|
03/25/2022 09:19:05 AM · #2 |
In Photoshop you can see exactly what's under the cursor in the "Info" window. I was taught to make adjustments based on that information and not on how it looked on screen, since monitors (and viewing conditions) are often so different.
For printing we aimed for the white area to be about 5% (gray equivalent) with a slight bias toward cyan if trying for a "cool" white, something like C=7, M=5, Y=4, K=0. |
|
|
|
03/25/2022 10:05:38 AM · #3 |
| The only way of having it look right on all the screens is to calibrate and apply a profile, which will essentially limit all the screens to the color gamut of the poorest one. |
|
|
|
03/25/2022 10:11:48 AM · #4 |
It's also hard because you can't control how others view images.
I use extensions in my browser so every background is all black for all sites. My office is all backlit, when they're on.
|
|
|
|
03/25/2022 10:34:37 AM · #5 |
For a background that you want to be *white*, you need to ensure that it is completely blown out, all pixels in that area should be 255,255,255. In your water glass image, that is only true for the upper left corner, and a small area above and to the left of the bowl of the glass.
Here's your image with a radical Curves adjustment to show the background:

What I did was dramatically steepen the curve in the highlights area to clearly show areas that are not truly white. This type of check can (and should) be done easily with a Curves adjustment layer, and then deleted.
The blotchiness that you see on the "bad" monitor is a combination of these not-quite-white areas and the poor color calibration of that monitor. The bad monitor shows why it is so important to ensure that backgrounds that are intended to be white are completely so. Same is true with black backgrounds; it's even more common for unevenness to show up there. |
|
|
|
03/25/2022 10:37:18 AM · #6 |
| One trick to manage just the background is to select by color range and select just the whites and almost-whites. Then convert this to a layer mask on a Curves Adjustment layer. Modify the mask to eliminate any areas you don't want to adjust, e.g. the near-white areas inside the glass. Then adjust curves to ensure that white areas are completely white. |
|
|
|
03/25/2022 10:54:35 AM · #7 |
Originally posted by kirbic:
For a background that you want to be *white*, you need to ensure that it is completely blown out, all pixels in that area should be 255,255,255. In your water glass image, that is only true for the upper left corner, and a small area above and to the left of the bowl of the glass.
Here's your image with a radical Curves adjustment to show the background:
What I did was dramatically steepen the curve in the highlights area to clearly show areas that are not truly white. This type of check can (and should) be done easily with a Curves adjustment layer, and then deleted.
The blotchiness that you see on the "bad" monitor is a combination of these not-quite-white areas and the poor color calibration of that monitor. The bad monitor shows why it is so important to ensure that backgrounds that are intended to be white are completely so. Same is true with black backgrounds; it's even more common for unevenness to show up there. |
I've done this type of thing before, but then I'm not sure how to fix it. I've sometimes ended up cloning or painting in the whites, because I haven't figured out how to select just the whites and the near whites. But with the general's showing the info box, I would guess I could then select the 254,254,255 ones and change them?
I know I can see the problem areas with radically changing the contrast, but then didn't know how to fix them. |
|
|
|
03/25/2022 12:43:40 PM · #8 |
Originally posted by vawendy:
I know I can see the problem areas with radically changing the contrast, but then didn't know how to fix them. |
Key is to do this non-destructively. First, use Select>Color Range to select the highlight range of interest. Then Apply that selection to the layer mask of a Curves Adjustment layer. Then manually tweak the layer mask to eliminate changes to areas you don't want affected (by painting in black on the layer mask). Finally, adjust the curves layer to get a white background. If required, iterate by tweaking the layer mask and readjusting the curve. Here is a quick edit of your water glass shot:
I did this in about 10 minutes using the method described. The BG is now 100% white. |
|
|
|
03/26/2022 12:31:07 PM · #9 |
Originally posted by kirbic:
Originally posted by vawendy:
I know I can see the problem areas with radically changing the contrast, but then didn't know how to fix them. |
Key is to do this non-destructively. First, use Select>Color Range to select the highlight range of interest. Then Apply that selection to the layer mask of a Curves Adjustment layer. Then manually tweak the layer mask to eliminate changes to areas you don't want affected (by painting in black on the layer mask). Finally, adjust the curves layer to get a white background. If required, iterate by tweaking the layer mask and readjusting the curve. Here is a quick edit of your water glass shot:
I did this in about 10 minutes using the method described. The BG is now 100% white. |
That's pretty much what I was doing, but I had a hard time with the masking. It seemed like it created a harsh line that didn't look right. But I forgot about blurring the mask, that might have fixed it.
Thanks all |
|
|
|
03/26/2022 12:38:43 PM · #10 |
Originally posted by vawendy:
...But I forgot about blurring the mask, that might have fixed it.
Thanks all |
Yes, when I painted in the modifications to the mask, I used a tool with a moderately feathered edge (brush tool hardness set about halfway or so). I also used a really crazy temporary setting on the curve so I could immediately see what was being affected by the mask, then readjusted the curve later. |
|
|
|
03/26/2022 09:22:39 PM · #11 |
Originally posted by kirbic:
Originally posted by vawendy:
...But I forgot about blurring the mask, that might have fixed it.
Thanks all |
Yes, when I painted in the modifications to the mask, I used a tool with a moderately feathered edge (brush tool hardness set about halfway or so). I also used a really crazy temporary setting on the curve so I could immediately see what was being affected by the mask, then readjusted the curve later. |
Thanks! |
|
Home -
Challenges -
Community -
League -
Photos -
Cameras -
Lenses -
Learn -
Prints! -
Help -
Terms of Use -
Privacy -
Top ^
DPChallenge, and website content and design, Copyright © 2001-2024 Challenging Technologies, LLC.
All digital photo copyrights belong to the photographers and may not be used without permission.
Current Server Time: 04/27/2024 05:39:22 AM EDT.


