
| You are not logged in. (log in or register) | |
|
|
How'd They Do That? :: Impact of a waterdrop
Impact of a waterdrop by RemieI've always wanted to make a picture of a waterdrop-impact with a regular 35-mm camera, but never actually did it, because I didn't think I could do it. Somehow I just thought it would end up in a lot of frustration and a lot of wasted film. There's no film to waste on a digital camera though and results can be seen instantly. Encouraged by the challenge, I decided to go for it. Having my digital camera for only 6 weeks, this was gonna be my first waterdrop-picture ever. I filled the sink in my bathroom, and although it was in the afternoon, there was not enough light in the room for my camera's autofocus to function. Therefor I turned on the light, which happens to be a 500W lightbulb (In case you might wonder: it also functions as a heating device when you take a shower). The bright lamp, caused a disturbing reflection on the watersurface though. To get rid of this reflection I softened the light, by closing my darkblue half-transluceant showercurtain. This worked perfectly. To freeze the action I was going to use the internal flash of the camera. Therefore the flash was going to be the main lightsource. The picture below illustrates the scene:  It was inavoidable that part of the sink would become visible on the picture. I had to hold the camera in such an angle that the drain in the bottom of the sink would not become visable, but still had a good view of the impact and the ripples. Because I knew I would have to to some cropping later to get the final picture, I had to hold the camera as close as possible to the spot where the drop would hit the water, resulting in a big sized image of the actual impact as well as a reasonable amount of the surrounding surface. With the camera in macro-mode, the closest I could get was about 10 centimeters/4 inches. Because the camera had to be above the watersurface, unfortunatly, I could not use a tripod. (note: I have found a solution for this tripod-problem while I was working on the next challenge. I mounted my small table-tripod on top of my regular tripod. This way I can position the camera above non-solid surfaces in different angles, or make horizontal pictures without the tripod being visible) To produce the actual drop, I adjusted the tap so that water dripped out with a regular time-interval (about once every second). Not only was this interval helping me in timing the shot, but it also caused a situation that the ripples of every previous drop where not totally vanished yet. This had a dramatic effect on the texture and refection of the surface. In a part of the picture, that's not visable on the final picture, but shown below, you can actually see how the new ripples slide over the old ones.  Because I have limited manual settings on my camera, I had to rely on my camera's autofocus. This was kind of a problem at first, because the autofocus doesn't work on reflecting plain surfaces. I solved this by waiting for a drop to hit the surface, then pressing the shutterbutton halfways to focus, waiting for a next drop to fall and finally, at the right moment, pressing the button to shoot the photo. After a lot trial and error, I got used to the interval of the falling drops, so I knew exactly when to focus and when to shoot. Then I "just" had to try until the impact looked the way I wanted it to look. It took me about two hours and about 100 shot's before I got the one I was aiming for. To make things "easier", once in a while I had to wipe of the water that splashed against the lens. The photo I decide to keep, is shown below (original size is 1600x1200):  Although it was possible to crop the picture so that the impact would be in the center of the picture (centering the object is a common thing to do withmacro-pictures), I cropped it in a more interesting way:  This way the picture complies to the "rules-of-thirds":  Both the waterdrop and the spot of impact are positioned at the crossing of the lines that divides the picture in thirds. The red arrows show how the observers eyes is lead around the picture. Because of the flash, the picture looked a little too bright to me, I "auto-equalized" it, resulting in a slightly darker picture. No futher manual level-adjustments were needed. In order to submit it to dpchallenge I resized the image to 640x480: 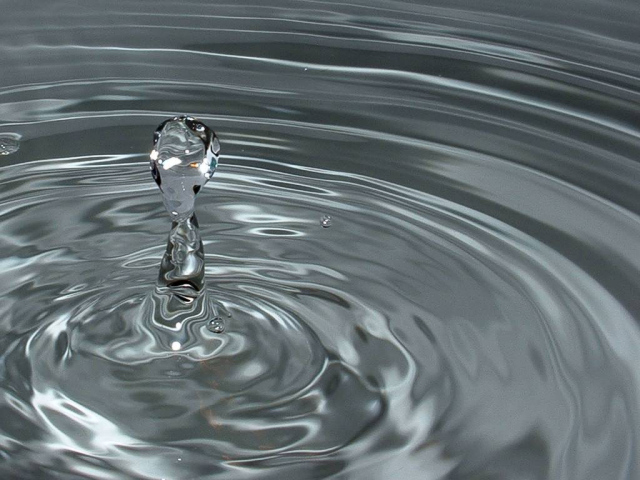 In many ways I like the picture a lot. It is stopped motion, with the drop perfectly in focus. At the same time, it almost looks like the outside rings are turning around with high speed. The turbulence caused by the ripples of previous drops is giving the texture of the watersurface an almost unreal look.
Home -
Challenges -
Community -
League -
Photos -
Cameras -
Lenses -
Learn -
Prints! -
Help -
Terms of Use -
Privacy -
Top ^
DPChallenge, and website content and design, Copyright © 2001-2024 Challenging Technologies, LLC. All digital photo copyrights belong to the photographers and may not be used without permission. Current Server Time: 04/18/2024 08:05:01 PM EDT. |

 Impact of a waterdrop