| You are not logged in. (log in or register) | |
|
|
|
How'd They Do That? :: Peek a Boo!
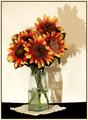
Peek a Boo! by mcraelPeek a Boo! is a 2-frame multi-exposure shot. I was originally planning to submit it with a dark background, then decided that I liked the light background better, and submitted that one instead. The photo examples in this tutorial show the dark background version. To convert the dark background to a light background, I simply turned the poster board around and adjusted my lighting accordingly. This tutorial shows my studio setup, method, and lessons that I learned. Studio materials: ------------------------ 2 60 watt clamp-on lights Dark green backdrop (didn’t have anything darker) 1 black poster board (reverse side is white) black velvet placemat 1 lace-trimmed hankerchief – used as doily beneath the flowers Antique mason jar, half-filled with water Bouquet of silk sunflowers Book and dog bone bucket (which I used as my seat) Method: ------------------ 1. Setup up the shot (please pardon my messy kitchen!):  2. Took a few shots to test the lighting and exposure. I wanted shadows for a more dramatic effect. 3. I used trial and error to determine how to place myself in the frame so that my face would correctly align with the center of a sunflower. Body height and the angle of my facial pose were especially important. I achieved the correct height by sitting on a book on top of a dog bone bucket in front of the table. 4. I shot many test shots and learned the following: · To block all of me except my face from appearing in the photo, I had to wear dark clothing, including gloves (or put my hands behind my back). The following picture shows my pose – without the gloves!  · The first frame (me) had to be shot without any zoom. The second frame (sunflowers) had to be shot at the zoom required to fill the frame like I wanted. · To prevent a double image of the sunflowers from appearing in the recorded image, I had to remove the sunflowers and doily from the scene while I snapped my pose in the first frame. In the light background version, I also had to remove the poster board. The following picture shows an undesired result.  I hadn’t yet worked out the clothing requirement, and was probably still trying to get the lighting right when I recorded this photo. You can see the sunflowers from the first frame right beside my left ear. I also hadn’t yet blocked out the junk beneath the table. The focus is way too soft. · Each frame required different lighting – overhead lighting for the first frame to capture only my face. Lower lighting on the sunflower scene to get the composition I wanted. The following picture shows the angle of my clamp-on lights.  · I know that I had to use the room’s overhead light for one of the frames – probably the sunflower frame so that I could focus correctly. I did not care if the first frame (me) was in focus, since clean focus would be obscured by the texture in the center of the sunflower anyway. I shot and recorded many photos – probably 50 or more. Many more were shot and not recorded. It was extremely difficult to correctly position myself and sunflowers in each frame to get the results I wanted. Working the “remove and replace” routine into muscle memory eventually allowed me to achieve consistent results! The photos with the dark background were shot around Thursday. The following pictures show what I was planning to submit.
The ones with the light background were shot on Sunday night. I was not able to achieve the composition I wanted on Sunday and finally gave up from exhaustion. On looking at the one photo I was able to capture on Sunday, I decided that having my face partially hidden met the challenge much nicer than having it fully exposed. This partial hiding of my face then inspired its Peek a Boo! title. (I was originally planning to title it something like “Inner Self Revealed.”) The following photos show what I actually submitted:
Post-processing: Rotated and cropped. Adjusted levels (approximate input levels of 0, 1.00, 238). Adjusted curves (approxmate input 70%, output 76%); Adjusted contrast +5. May have adjusted saturation. Used unsharp mask at approximately 75% at 2 pixels. Added 2 borders. The important thing that I learned from shooting the two versions, is that it’s important to get the composition and exposure of the final frame correct. In the light background version, I found that I still had to wear a black turtleneck top to capture only my face, not white as I originally thought. I also learned that this photo was not as hard to achieve as I originally thought it would be. Regards, Linda McRae
Home -
Challenges -
Community -
League -
Photos -
Cameras -
Lenses -
Learn -
Help -
Terms of Use -
Privacy -
Top ^
DPChallenge, and website content and design, Copyright © 2001-2026 Challenging Technologies, LLC. All digital photo copyrights belong to the photographers and may not be used without permission. Current Server Time: 06/09/2026 01:54:26 AM EDT. |