|
Making of: The Pier

On the picture page I was kindly asked by  wavelength if I could
create a walk-through on this piece. Seeing as it wasn't much I figured I might
as well write it up. Hope you enjoy & I'm looking for a DPC mentor as I've
never taken a photography class in my life! Any help is appreciared :) Let's
start: wavelength if I could
create a walk-through on this piece. Seeing as it wasn't much I figured I might
as well write it up. Hope you enjoy & I'm looking for a DPC mentor as I've
never taken a photography class in my life! Any help is appreciared :) Let's
start:


Image 1
Image 2
Image 3
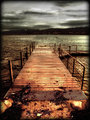
Image 1: The original, duplicate x 2.
Image 2: Conversion to B/W. Adjust levels, Play with Contrast, Use Dodge
& Burn selectively.
Image 3: Apply Blur brush in background, sharpen brush in foreground,
use stamp to remove any items you don't want (in this case the raft).


Image 4
Image 5
Image 6
Image 4: Apply Gradient Overlay to put emphasis on foreground.
Image 5: Use 2nd duplicate of original, gaussian blur, adjust color balance
& contrast (might want to do step 7 first in order to see your changes as
you do them).
Image 6: Apply Gradient Overlay to put emphasis on foreground.

Image 7
Image 7: Apply the layer style Multiply to the color layer

Image 8
Image 8: Final PS Structure.
It's a short walkthrough, but there also isn't much to do :) You should be
able to do all this in 15 minutes. Hope you liked it and feel free to post any
questions in the discussion thread (or even show your results)!
|