| You are not logged in. (log in or register) | |
|
|
How'd They Do That? :: Moonrise, Painted Hills, Oregon
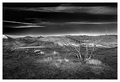
Moonrise, Painted Hills, Oregon by DrAchooSome people asked for my processing steps used to come up with my B&W Master’s Free Study. I’ll try to share by going over each layer on my PSD file and what I’m doing and thinking. First we start with the basic photo which has been converted in RAW. 
The sun was at my back and very low on the horizon after sunrise. The first thing I wanted to change was to lighten the shadows on the hills to the left. I did this by processing the RAW file again with a higher exposure, opening it on a new layer and masking off everything but the hills. 
The next step was the make the sky darker. I did this by creating a new layer of the combined two layers below (Shift-Ctrl-Alt-E). I set the blending mode to multiply and used a gradient mask to cause the darker layer to fade out around the horizon. Sometimes I’ll go back with a very soft brush and fix things that stick up through the gradient that I still want brighter, but I didn’t think it necessary on this shot. 
Because I was using a polarizer, you can see the left side of the sky is darker than the right. I wanted to even this out so I used a selective color adjustment layer and added +70 to the blacks of the Blue color. Because I wanted this to affect mainly the right side I did another gradient layer mask which masked off the left side and caused the sky to even out overall. 
Usually the first adjustment layer I choose is Brightness/Contrast. Here I did it second, but I goofed around to what looked good. In this case it was +20/+15. I don’t often use Brightness, but here it was needed. I did another Brightness/Contrast layer to add just a bit more contrast (0/+10), but I masked it off the worst portions of the picture which were the dark hill on the left and the bright spot located behind the tree. 

The next step was to create another layer of everything below (Shift-Ctrl-Alt-E again). This layer is for Shadows/Highlights. I also used this layer to clone some dust spots out. I don’t recall cloning much else in this picture. The S/H levels I chose were 10/20. I much more often use Highlights only, but this one did need some more lightening of the dark sections. Be careful when you lighten the shadows because you can easily introduce a lot of noise. 
Now I came to the point where I wanted to convert to B&W. Personally I use the Channel Mixer adjustment layer. The first thing I did was to hit Ctrl-1, Ctrl-2, and Ctrl-3 to look at each channel (red, green, blue). Here I can evaluate which channel is closest to what I want or which portions of the picture look best with which channel. Interestingly here I liked the red channel for the dark sky, the green channel for the mid-layer of hills, and the blue channel for the foreground. To get it back to color you hit Ctrl-~ 


The next layers are going to look a bit funny because they include my masking. Here is the B&W portion of the red channel I used. Note the red channel is used for the sky as well as causing highlights on the tufts of grass that are sticking up. Whenever I do masking I almost always use a largish brush with a hardness of 0-5%. I almost never mask with a hard brush. I think one gets more natural looking results this way. The settings for the red channel were 120/0/-20. If you haven’t used this adjustment layer before you need to check the little “monochrome” box at the bottom to make it B&W. The -20 on the blue channel helped darken the sky even more. You generally want your numbers to add up to about 100. I then did a “clipping layer” (an adjustment layer which affects the adjustment layer below) which was another Brightness/Contrast layer (30/20) to add more punch to the B&W. 

The next layer you will see is the Blue channel mixer (0/0/100). You can see it mainly affects the foreground and far background mountains. 
Finally the green layer is used for the Painted Hills themselves. (0/100/0) The overall goal for the conversion was to keep the three layers (foreground, midground, sky) separate and distinct from each other. 
Now, I usually resize before I start USM stuff. So I resized down to 700 pixels. I generally start with a USM of about 300/0.3/0. I don’t have the exact settings for this one. I’m guessing it was a bit lower because the grass and tree are objects that will oversharpen quickly. I probably still oversharpened it, but I did the best for my own eye and monitor. The next step is to do a wide-radius USM layer which adds local contrast. I generally start with about 25/40/0 and again don’t have the exact settings for this one. 

I still wanted sections of the sky darker so I used the burn tool on a new layer to obtain that. Generally I will burn on Midtones about 8% with a soft brush and just flavor to taste. I actually don’t tend to use dodge a lot (probably to my detriment), but in this one I created a new layer and dodged the clouds and tufts of grass. 

Finally, over the course of weeks I kept going back to lighten the foreground. I didn’t want the picture to be too dark over all. I wound up with this which is another Brightness/Contrast layer (30/15) which has the sky masked off and that pesky highlight behind the tree. This gives us our final result. 
I hope this was helpful. I certainly wouldn’t consider myself a B&W expert so there may be better ways of doing things than presented here.
Home -
Challenges -
Community -
League -
Photos -
Cameras -
Lenses -
Learn -
Prints! -
Help -
Terms of Use -
Privacy -
Top ^
DPChallenge, and website content and design, Copyright © 2001-2024 Challenging Technologies, LLC. All digital photo copyrights belong to the photographers and may not be used without permission. Current Server Time: 04/24/2024 01:38:17 AM EDT. |