| Author | Thread |
|
|
06/12/2007 12:44:02 PM |
| This is the one I was talking about. Freakin' amazing. |
|
 Photographer found comment helpful. Photographer found comment helpful. |
|
|
10/02/2006 01:18:09 AM |
| gotta love the cartoonish look |
|
| Photographer found comment helpful. |
|
|
09/10/2006 11:19:41 PM |
wow impressive editing. I really like how it turned out... looks very futuristic.
mH |
|
| Photographer found comment helpful. |
|
|
08/10/2006 11:51:29 PM |
whose thinks this is awesome?
this guy!
Message edited by author 2007-11-27 22:45:23. |
|
| Photographer found comment helpful. |
|
|
08/10/2006 03:33:25 PM |
|
| Photographer found comment helpful. |
|
|
07/10/2006 01:28:17 PM |
| Wow! Incredible picture, definitely think the edited one is more impressive, colors are great. Nice job!! |
|
| Photographer found comment helpful. |
|
|
07/08/2006 02:54:45 PM |
|
| Photographer found comment helpful. |
|
|
06/29/2006 01:19:00 AM |
Originally posted by Cam:
Lets party in Austin, we can all crash at Yanko's place !
Super shot man !! |
LOL. But first I'll have to photoshop my place to make it more spiffy. :P |
|
|
|
06/29/2006 01:13:34 AM |
| Beautiful workmanship, astounding rewarding result - inclusion of your generous and complete listing of the edit steps is a example for all. A very excellent & enjoyable presentation in all aspects. |
|
| Photographer found comment helpful. |
|
|
06/29/2006 12:00:19 AM |
Lets party in Austin, we can all crash at Yanko's place !
Super shot man !! |
|
| Photographer found comment helpful. |
|
|
06/26/2006 11:40:53 PM |
| WOWEEE!!! This is amazing... Stunning image. And THANK YOU for including your steps so the rest of us can learn from it. You rock! |
|
| Photographer found comment helpful. |
|
|
06/25/2006 06:23:12 PM |
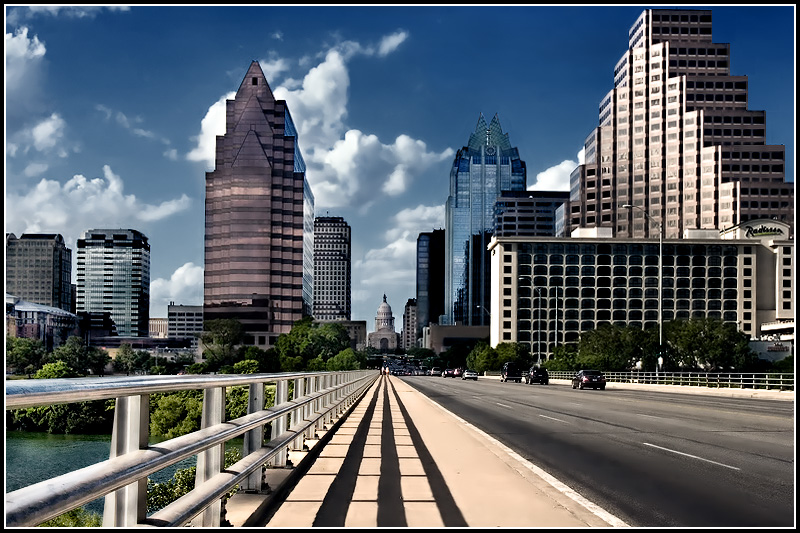
| This is sweet! I'm surprised I haven't seen it before. Minor thing in addition to what you've already done is fixing the verticals. It's evident in the embankment ;) Aside from that, this is sweet dude! |
|
| Photographer found comment helpful. |
|
|
06/18/2006 03:14:35 PM |
| This is a masterpiece. After living in Austin for thirty years - and being gone for 5, this photo makes me want to move back even more! |
|
| Photographer found comment helpful. |
|
|
06/18/2006 02:38:18 AM |
| this is one of my favorite pictures. |
|
| Photographer found comment helpful. |
|
|
06/17/2006 01:23:59 AM |
| Austin never looked so good! |
|
| Photographer found comment helpful. |
|
|
06/15/2006 03:37:05 PM |
|
| Photographer found comment helpful. |
|
|
06/15/2006 03:28:51 PM |
| Amazing work...I need to get better at PS...talent is what this is |
|
| Photographer found comment helpful. |
|
|
06/11/2006 02:18:46 AM |
| WOW - that is amazing. All of your trouble is really worth it. That is just fantastic. |
|
| Photographer found comment helpful. |
|
|
06/11/2006 01:53:39 AM |
|
| Photographer found comment helpful. |
|
|
06/11/2006 01:00:38 AM |
| WOW! An amazing transformation! Thanks *so* much for sharing your editing process! |
|
| Photographer found comment helpful. |
|
|
06/10/2006 10:19:41 PM |
| WOW!!! That's what I said when I first looked. This is fantastic!! |
|
| Photographer found comment helpful. |
|
|
06/10/2006 10:12:46 PM |
|
| Photographer found comment helpful. |
|
|
06/10/2006 09:48:46 PM |
| Amazing! You sure put a lot of work into this photo and it paid off..this is gorgeous. |
|
| Photographer found comment helpful. |
|
|
06/10/2006 09:47:34 PM |
| sooo beautiful, and thanks for sharing your process!! |
|
| Photographer found comment helpful. |
|
|
06/10/2006 08:42:04 PM |
|
|
|
06/10/2006 06:20:14 PM |
Very nice shot--
Interesting Post Proc. on this, almost looks like a painting, any details? |
|
| Photographer found comment helpful. |
Home -
Challenges -
Community -
League -
Photos -
Cameras -
Lenses -
Learn -
Help -
Terms of Use -
Privacy -
Top ^
DPChallenge, and website content and design, Copyright © 2001-2024 Challenging Technologies, LLC.
All digital photo copyrights belong to the photographers and may not be used without permission.
Current Server Time: 12/01/2024 07:45:45 PM EST.