| This Tutorial |
Tutorial Viewed: 48022 times
Discussion: Click Here |
Tutorials Home
|
Tutorials :: Methods of Black and White Conversion
Methods of Black and White Conversion by fotomann_forever
 Many
photographers and viewers love the look of Black & White photography.
Before digital, a photographer had to choose the right film for the subject,
use colored filters, shoot and then apply the correct development technique
to produce the image he or she wanted. Many
photographers and viewers love the look of Black & White photography.
Before digital, a photographer had to choose the right film for the subject,
use colored filters, shoot and then apply the correct development technique
to produce the image he or she wanted.
Digital photography has relieved us of having
to make a choice in the film we use, but leaves a whole gamut of choices
for post-processing, all with very different results. Here, we'll discuss
some of the methods we have at our disposal.
We'll start with this original unprocessed
RAW file. |
Method 1: Simple Desaturation = BAD
 Now
let's just desaturate it. In Photoshop, I've chosen Image > Adjustments
> desaturated. Also, you will get the same results by using Image >Mode
> Greyscale, or by simply sliding the Saturation slider to -100% in
the Hue/Saturation adjustment dialog. Now
let's just desaturate it. In Photoshop, I've chosen Image > Adjustments
> desaturated. Also, you will get the same results by using Image >Mode
> Greyscale, or by simply sliding the Saturation slider to -100% in
the Hue/Saturation adjustment dialog.
Yes, it's black & white, but is really
flat and has barely any contrast, mostly just a grey blob. We could bump
up the contrast and do some tweaking, but in general this method provides
us little control of the conversion process. Let's move on. |
Method 2: Channel Mixer
 The
Channel Mixer is one of the simplest, yet controllable, methods of converting
to B&W. Working with our same unaltered RAW image again, I'll apply
a Channel Mixer to the image for a one pass B&W conversion. Click
Layer > New Adjustment Layer > Channel Mixer. Gimp users can use
Filter > Color > Channel Mixer. The
Channel Mixer is one of the simplest, yet controllable, methods of converting
to B&W. Working with our same unaltered RAW image again, I'll apply
a Channel Mixer to the image for a one pass B&W conversion. Click
Layer > New Adjustment Layer > Channel Mixer. Gimp users can use
Filter > Color > Channel Mixer.
Once you have clicked the above command, a dialog box pops up with Four
Sliders. You will also see a check box at the bottom that says monochrome.
Since we want to do a B&W image, check that box. The image should
turn gray. Now let's tweak it.
The sliders for the color channels control the brightness of that particular
channel, allowing you to control which each individual channel contributes.
The Constant slider controls overall brightness of the image.
A general rule is that these boxes should add up to around 100%. That
rule was meant to be broken. With this image, for example, to achieve
the contrast I like, the numbers are coming up at 134%. The more over
100% the numbers are the more overall brightness the image will have.
 Here's
what I got: Here's
what I got:
- Red: +40%
- Green +34%
- Blue +60%
- Constant: 0%
Notice how much more contrast this image has than the simple desaturation
method. It looks more like the output of B&W film.
If the aim is to mimic the luminosity perceived by the human eye, set:
- red=30%
- green=59%
- blue=11%.
This is a good place to start when working with your own image. |
Method 3: Hue/Saturation Adjustment Layers
Warning: This method is not legal
under Basic Editing Rules at DPC, as it uses an adjustment layer in a
blending mode other than normal.
 In this
method we'll use two separate Hue/Saturation Adjustment layers for our
conversion. One layer takes away the color, while a second layer allows
us to apply filters to the conversion. In film B&W photography, filters
are commonly to manipulate contrast. For example a yellow filter will
enhance the contrast between clouds and sky by darkening the latter. Orange
and red filters will have a stronger effect. This method mimics that technique. In this
method we'll use two separate Hue/Saturation Adjustment layers for our
conversion. One layer takes away the color, while a second layer allows
us to apply filters to the conversion. In film B&W photography, filters
are commonly to manipulate contrast. For example a yellow filter will
enhance the contrast between clouds and sky by darkening the latter. Orange
and red filters will have a stronger effect. This method mimics that technique.
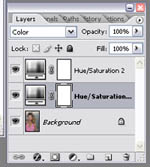
Here are the layers you will be using. Notice
the layer selected is in color mode. This is the layer that you
will be adjusting hue on.
|
First create the B&W layer:
Create a Hue/Saturation Adjustment layer. Set the saturation slider to
-100%. You're done with that layer.
Now beneath the first adjustment layer create a second Hue/Saturation
adjustment layer. This adjustment layer should be set to Color Mode. Now
while watching the image, move the Hue slider and watch how it changes
your image. Once you find a look you like, you can use the Saturation
slider to control the intensity of the filter effect.
For this image, I like the high-contrast look that an intense green filter
is giving me. My settings are: Hue +37, Saturation +65.
This mehthod works as long as one of the layers is in color mode and
one in normal mode. |
Method 4: Photo Filter-Hue/Saturation
This method is legal under basic rules at DPC.
 A new
adjustment layer in Adobe Photoshop CS2 the Photo Filter can be used quite
effectively for conversion and in a more intuitive way than the dual Hue/sat
layers. I like this method because it more closely represents the actual
filters photographers have used in film. A new
adjustment layer in Adobe Photoshop CS2 the Photo Filter can be used quite
effectively for conversion and in a more intuitive way than the dual Hue/sat
layers. I like this method because it more closely represents the actual
filters photographers have used in film.
 Let's
start by creating a Hue/Sat adjustment layer. Slide the Saturation slider
to -100. Let's
start by creating a Hue/Sat adjustment layer. Slide the Saturation slider
to -100.
Underneath that layer, create a Photo Filter adjustment layer. Click
on the preserve Luminosity checkbox in that dialog. Now you are free to
play with the color and density of that filter.
This image is a "Deep Blue" filter at 100% Density. |
Method 5: Single Channel Conversion
 In
a color image in RGB mode, the image is composed of 3 B&W channels,
one each for Red Green and Blue. As shown in the illustration to the left.
You see that I have only the red channel visible. Unlike the Channel Mixer
method, this channel uses only one channel for conversion. In
a color image in RGB mode, the image is composed of 3 B&W channels,
one each for Red Green and Blue. As shown in the illustration to the left.
You see that I have only the red channel visible. Unlike the Channel Mixer
method, this channel uses only one channel for conversion.
There are few way to do this method, but for simplicity, select only
the red channel, select all the image and paste it into a new greyscale
document. Your are now ready to do any post-processing such as curves
and levels.
In general, the blue channel will have the most noise, while the green
channel will have the least, but which channel you select will also depend
on the look you want.
Another variation of this method is to edit the image in LABmode, deleting
all but the Lightness channel.
|
Adding Duotone to Your Conversion
 One
simple way to add a nice look to your photo is a Duotone. This is quite
simple and can provide a nice look to your converted image. One
simple way to add a nice look to your photo is a Duotone. This is quite
simple and can provide a nice look to your converted image.
After you have used either of the above methods to make a B&W image
(I've used the example from the Channel Mixer method), flatten the image
by clicking Layer > Flatten Image.
Now, click on Image > Mode > Greyscale.
You are ready for Duotoning. Click on Image > Mode >Duotone. You
can now select the color that make up your Duotoned image. There are presets
you can load that come along with Photoshop.
I'm going to use a Tritone that I like for a sepia look, which consists
of Black, PANTONE 1215 C, and PANTONE 202 C.
After you are finished. We need to convert back to an RGB image. Click
Image > Mode > RGB. |
After the conversion
 This
image was created from an unprocessed RAW file. When working with black&white
conversions, I prefer the data to be as flat as possible. This gives me
less possibility of banding and other artifacts in conversion. But, it
means I have to do some processing after I convert the file. This
image was created from an unprocessed RAW file. When working with black&white
conversions, I prefer the data to be as flat as possible. This gives me
less possibility of banding and other artifacts in conversion. But, it
means I have to do some processing after I convert the file.
 For this
photo, I created a Curves Adjustment Layer to enhance mid-tone contrast
of the example I used in the Hue/Saturation method, this is called an
s-curve. For this
photo, I created a Curves Adjustment Layer to enhance mid-tone contrast
of the example I used in the Hue/Saturation method, this is called an
s-curve.
|
Home -
Challenges -
Community -
League -
Photos -
Cameras -
Lenses -
Learn -
Help -
Terms of Use -
Privacy -
Top ^
DPChallenge, and website content and design, Copyright © 2001-2025 Challenging Technologies, LLC.
All digital photo copyrights belong to the photographers and may not be used without permission.
Current Server Time: 04/26/2025 12:36:53 AM EDT.
|
