| Image |
Comment |
| 10/06/2017 12:37:03 AM |
|
 Photographer found comment helpful. Photographer found comment helpful. |
| 10/04/2017 01:23:22 PM |
|
| Photographer found comment helpful. |
| 10/01/2017 11:14:32 AM |
|
| Photographer found comment helpful. |
| 10/01/2017 12:41:39 AM |
|
| Photographer found comment helpful. |
| 02/08/2017 12:22:38 AM |
|
| 02/07/2017 11:54:46 PM |
|
| 08/10/2016 01:45:31 PM |
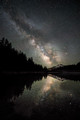
Mt.-Bachelor-reflected-in-Todd-Lakeby SchoComment by Scho: Originally posted by tate:
a crowd pleaser - no doubt. Can't wait to see the settings / method on this one. Very nice. |
Thank you for your nice comments. You requested an explanation of how this was created, here it is: The camera settings were f/2.8, 25 seconds with ISO of 2500. I copied the raw image into Lightroom (LR). I made a virtual copy of the image and used the Basic Panel in LR to process one copy to optimize the sky and the other copy to optimize the foreground and Lake. I then took both copies into Photoshop (PS) as layers and using a luminosity mask, blended the two copies together to utilize the sky from one and the foreground from the other. I then used 2 different lights luminosity masks to lighten the Milky Way; a lights luminosity mask to lighten the mountain; and a lights luminosity mask to slightly darken the reflection; a used a curves adjustment to lighten the image, covered it with a black mask and painted in those portions of the Milky Way that I wanted to lighten further; I used a rough selection of the mountain and lightened with a curves adjustment; I used a darks luminosity mask to darken portions of the sky and reflection; I used one color balance layer; I used Nik Color Efex Pro (Darken/Lighten Center) to create a slight vignette; I finished by merging all layers into one (Cmd/Option/Shift/e), performed noise reduction on that layer with the Imagemonic Noise Reduction Plug-in and then used a luminosity mask to apply the noise reduction only to the darkest parts of the image. Thats probably more than you want to know - but there it is. Feel free to follow-up with any questions that you might have. |
| 08/08/2016 12:27:04 PM |
Mt.-Bachelor-reflected-in-Todd-Lakeby SchoComment by Scho: Thank you for your nice comments. For those who requested an explanation of how this was created, here it is: The camera settings were f/2.8, 25 seconds with ISO of 2500. I copied the raw image into Lightroom (LR). I made a virtual copy of the image and used the Basic Panel in LR to process one copy to optimize the sky and the other copy to optimize the foreground and Lake. I then took both copies into Photoshop (PS) as layers and using a luminosity mask, blended the two copies together to utilize the sky from one and the foreground from the other. I then used 2 different lights luminosity masks to lighten the Milky Way; a lights luminosity mask to lighten the mountain; and a lights luminosity mask to slightly darken the reflection; a used a curves adjustment to lighten the image, covered it with a black mask and painted in those portions of the Milky Way that I wanted to lighten further; I used a rough selection of the mountain and lightened with a curves adjustment; I used a darks luminosity mask to darken portions of the sky and reflection; I used one color balance layer; I used Nik Color Efex Pro (Darken/Lighten Center) to create a slight vignette; I finished by merging all layers into one (Cmd/Option/Shift/e), performed noise reduction on that layer with the Imagemonic Noise Reduction Plug-in and then used a luminosity mask to apply the noise reduction only to the darkest parts of the image. Thats probably more than you want to know - but there it is. Feel free to follow-up with any questions that you might have. |
| 08/08/2016 12:11:30 AM |
|
| Photographer found comment helpful. |
| 08/07/2016 06:41:23 PM |
Mt.-Bachelor-reflected-in-Todd-Lakeby SchoComment by PenelopeK: Wonderful!
ETA: Congratulations. I love the composition, especially how the shorter band of light looks like it is emanating from the top of the mountain. Message edited by author 2016-08-08 11:01:00. |
| Photographer found comment helpful. |
Home -
Challenges -
Community -
League -
Photos -
Cameras -
Lenses -
Learn -
Help -
Terms of Use -
Privacy -
Top ^
DPChallenge, and website content and design, Copyright © 2001-2025 Challenging Technologies, LLC.
All digital photo copyrights belong to the photographers and may not be used without permission.
Current Server Time: 04/11/2025 05:50:01 AM EDT.