| Author | Thread |
|
|
08/05/2005 08:46:09 AM · #1 |
Does anyone have any tips/tricks for getting an old-fashioned "hand-tinted" look for photos using PS? I'm not really sure if there was an easier way that what I tried (lots of magic wand and lasso tool, then the brush at a low opacity). Please post any advice, as well as comments on the before and after version of this picture:
Original:

Tinted:

Thanks for your comments in advance!
Caleb
|
|
|
|
08/05/2005 09:11:04 AM · #2 |
Originally posted by caleblack:
Does anyone have any tips/tricks for getting an old-fashioned "hand-tinted" look for photos using PS? I'm not really sure if there was an easier way that what I tried (lots of magic wand and lasso tool, then the brush at a low opacity). Please post any advice, as well as comments on the before and after version of this picture:
Original:
Tinted:
Thanks for your comments in advance!
Caleb |
I think one way to use PS for that hand tinted look is to shoot in color, then convert to b&w in ps and then use the history brush to paint parts back in at a lower opacity.
I'm sure there are better ways...this is the only way I've done any though.
|
|
|
|
08/05/2005 09:33:18 AM · #3 |
I always use layers for this.
Option 1) Shoot it in colour first, duplicate your colour photo, and turn the back layer into a black and white. Go to the colour layer, erase the areas you want to be BW, and then play with the saturation levels of the colour layer until it's what you're after. Shooting in colour lets you keep some subtle colour variations across objects, which is hard to do get back once you've only got the BW image.
Option 2) Alternatively, if you originally shot in BW, you can use 2 layers. Paint your colours onto the background layer, and set your BW photo in the top layer in luminance mode. Just make sure you painting into the background layer only. Paint into the top layer and you'll lose your photo.
Option 3) if you only want a single colour, or large patches, you can duplicate and colorise the BW image, and then erase the bits of the colorised layer where you want the image to stay the original BW.
|
|
|
|
08/05/2005 09:37:37 AM · #4 |
I've done a quick edit job on your photo. I used my Option 2 for editing, plus a bit of burning on the background to increase the contrast. It's a rough job, but it shows the concept.
I don't have a dpchallenge account, so I've just dropped in a link to the image...
//www.surfplan.com.au/dea/photos/posted/213932.jpg
Message edited by author 2005-08-05 09:39:09. |
|
|
|
08/05/2005 10:10:09 AM · #5 |
I use this (muted colors) to achieve a decent effect. A mask layer and changes in the opacity could be used also to do more extensive work.
Some examples
 
 
|
|
|
|
08/05/2005 01:30:16 PM · #6 |
Thanks for all the responses. I do like the muted colors effect (gonna d/l that when I get home), and you've got some great ideas/techniques surfdabbler. I'll just keeping working at it. Thanks again!
|
|
|
|
08/05/2005 02:28:33 PM · #7 |
I can't remember everything I did to this (years ago), but I think it involved about 28 layers using lots of soft-edged selections, Curves, and painting using "Color" mode.
Original B&W scanned print: 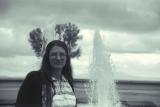 Final print image: Final print image:  |
|
Home -
Challenges -
Community -
League -
Photos -
Cameras -
Lenses -
Learn -
Help -
Terms of Use -
Privacy -
Top ^
DPChallenge, and website content and design, Copyright © 2001-2025 Challenging Technologies, LLC.
All digital photo copyrights belong to the photographers and may not be used without permission.
Current Server Time: 03/12/2025 09:49:45 AM EDT.


