| Author | Thread |
|
|
07/12/2008 02:30:01 AM · #1 |
Based on the experience and the feedback in this thread, here is a thread specifically for posting images where you post both the "Before" (resized original) and "After" versions of the image.
In furtherance of the educational mission of the site, it is strongly encouraged that you post the editing steps in as much detail as possible in the image info area, this thread, or both. However, no one is required to divulge any "trade secrets" ...
I think this was originally intended primarily as a forum for newly-edited pictures, though I see nothing wrong with posting the occasional old image to illustrate some particular editing technique, and it certainly seems fine to post a new edit of an old shot. In fact, what could be really interesting is to find an old shot you've already edited (or maybe entered in a challenge), and see how you might edit it differently today, then post all three versions.
OK, 1 - 2 - 3 - Go! |
|
|
|
07/12/2008 02:43:20 AM · #2 |
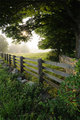
I took this on my way home from Concord to Oakland ... I saw the fog creeping over the ridge and really wanted to capture it, but my shooting "window" was maybe only four to eight seconds (and fourteen inches). This was shot with an eight year old, 2MP camera, on (and in) "auto" mode ... editing steps in the edited version.
Original: 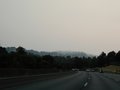 Edited: Edited:  |
|
|
|
07/12/2008 11:57:13 AM · #3 |
Great idea, especially since I had to bail on the side challenge last month.
From this thread.
Before:  After: After: 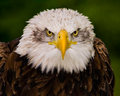 |
|
|
|
07/12/2008 12:08:31 PM · #4 |
 to to 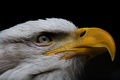
I can see everywhere I masked - gotta stop rushing... |
|
|
|
07/12/2008 12:14:10 PM · #5 |
Originally posted by Ann:
Great idea, especially since I had to bail on the side challenge last month. |
Perfect timing -- I was just going to bump this for the daytime crowd.
I don't know what half those adjustments/controls do ... my software is even older than that camera ... :-) |
|
|
|
07/12/2008 12:20:17 PM · #6 |
I like these threads - cool to watch the transition from start to finished product.
Here is my recent Rural Landscape entry and its original file
 to to 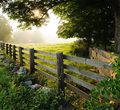 |
|
|
|
07/12/2008 01:17:16 PM · #7 |
Well, someone locked the June 'Before & After' thread before I had time to post my final addition. Here, anyway is my effort for the 30th of June:
Before: 
After: 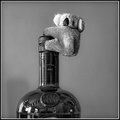
I may be slow, but I get there in the end.
|
|
|
|
07/12/2008 01:29:59 PM · #8 |
|
I can temproarily unlock it if you want to post this over there as well ... |
|
|
|
07/12/2008 02:20:00 PM · #9 |
 and after: and after: 
Gotta' love a good ultra-wide angle lens. |
|
|
|
07/12/2008 02:22:53 PM · #10 |
Before  and after and after 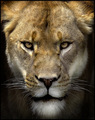 |
|
|
|
07/12/2008 02:52:49 PM · #11 |
You are now watching this thread.
:) |
|
|
|
07/12/2008 03:05:44 PM · #12 |
Originally posted by TCGuru:
You are now watching this thread.
:) |
Agreed. This is good stuff.  TCGuru and some others here are always good about it, but please make no mistake... TCGuru and some others here are always good about it, but please make no mistake...
It is ALWAYS helpful when you share your processing steps -- at least helpful to the likes of me, always learning. Even more than that is seeing shots before and after for comparison, so please keep posting! |
|
|
|
07/12/2008 05:48:57 PM · #13 |
Before -- Straight from the camera (only resized)

After RAW conversion

The entry in the June FS

From that same weddding --
Before 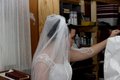 After After 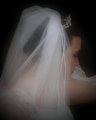
(this was "originally" my FS entry, then I remembered that obliterated background thing )
Message edited by author 2008-07-12 17:57:52. |
|
|
|
07/17/2008 06:26:27 PM · #14 |
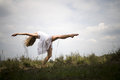
I was at a fun event at Lawrence Hall of Science yesterday -- I thought this school/camp group in their "matching" tie-dyed shirts were very cute in that "only in Berkeley" way ...
Stealthily shot from waist-level while swinging around a bag with ice and ice cream fixin's ... ;-)
Resized original: 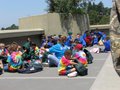 Edited: Edited:  |
|
|
|
07/21/2008 02:42:21 PM · #15 |
Thanks,  GeneralE - didn't know this was here! Good thread to watch! You can lock the other thread I started if you wish. GeneralE - didn't know this was here! Good thread to watch! You can lock the other thread I started if you wish.
OK, not a lot of editing in comparison to what some of the folks here can do, but for me it was a lot of processing. Robert ( Bear_Music) asked what I did, so here's the rundown for those who may be interested and aren't quite as skilled at processing as some of the folks here are: Bear_Music) asked what I did, so here's the rundown for those who may be interested and aren't quite as skilled at processing as some of the folks here are:
Original: 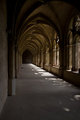
Entry: 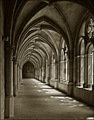
Processing: Crop - pretty significant by my standards. Adjustment layers - levels; shadows/highlights (14%/10%); brightness/contrast (6/24); flatten image, duplicate layer and change blending mode to soft light. And then, yes, ladies and gentlemen, I dodged! I burned! Not a lot, but brought out the detail in the ceiling and the little wall at the back. Next, converted to B&W using the CS3 B&W adjustment and tritoned using the burgundy/gold CS3 tritone (my personal favorite). Sharpening was involved somewhere in there, then I added grain and faded to taste. |
|
|
|
07/21/2008 03:01:57 PM · #16 |
Originally posted by Ann:
Great idea, especially since I had to bail on the side challenge last month.
From this thread.
Before: After: |
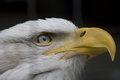
I find the steps you took in Photoshop very interesting:
* NeatImage on green areas only
* Multiply layer on just the eyes, 30% opacity
* Hue sat layer on just the eyes, +10 saturation of yellows
* Soft light layer on whole image, 20% opacity
* Smart Sharpen, 200%, 0.4 px, Lens blur mode. Did this in its own layer.
* Set sharpen layer to luminosity mode, 80% opacity.
* Created a layer mask on the sharpen layer, and used the brush to selectively tone down the sharpening around the head.
Can you write a tutorial out of this? Could be very interesting (for me anyway) |
|
|
|
07/21/2008 03:24:08 PM · #17 |
Originally posted by ssocrates:
Can you write a tutorial out of this? Could be very interesting (for me anyway) |
It can also be profitable for Ann -- I believe you get a free month's membership extension (or $5 print credit) if you submit a Tutorial ... screen-shots to illustrate the various steps are good ... ;-) |
|
|
|
07/22/2008 06:57:21 PM · #18 |
My last entry in the free study of May
PP:
In the RAW: b/w, vignette, high contrast
After that: graduated neutral density in NIK-filters, and I added a slight blue color with glamour glow. Cloned some dust-spots and some weed, crop.
This photo (end-result) shows to me how you can make a potential "nice" photo a really good one with the right post-processing. I hope you guys think the same :P
|
|
|
|
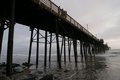
07/22/2008 09:37:34 PM · #19 |
-crop
-resize
-sharpen
-noise reduction
-saturation
-contrast
-adjust the curves slightly to brighten it up
-sharpen again
|
|
|
|
07/25/2008 04:59:32 PM · #20 |
Originally posted by ssocrates:
Originally posted by Ann:
Great idea, especially since I had to bail on the side challenge last month.
From this thread.
Before: After: |
I find the steps you took in Photoshop very interesting:
Can you write a tutorial out of this? Could be very interesting (for me anyway) |
SoulMan1978 is graciously allowing me to use his shot for a tutorial, so I'll give it a try. I'm crazy busy right now, though, so it might be a few weeks before I get done. |
|
|
|
07/25/2008 05:07:19 PM · #21 |
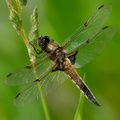
Before: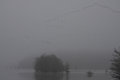 After: After: 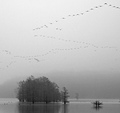
This is my highest rated photo. I submitted it for Birds (advanced editing) and I only processed within the basic rules. |
|
|
|
07/25/2008 06:02:11 PM · #22 |
|
I'm glad somebody carried this forward. I thought about it, but wasn't sure if anybody would be interested. I'll have to drop in from time to time to see and be seen. :-) |
|
|
|
07/30/2008 04:58:56 PM · #23 |
A recent entry ... trying to evoke moonlit snowy woods, perhaps in the dreamlike style of Maurice Sendak? ...
Original: 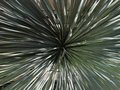 Entry: Entry: 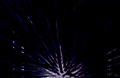 |
|
|
|
08/08/2008 12:17:58 PM · #24 |
July FS - pretty pleased with what I was able to pull out of the shot.
Original: 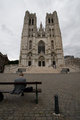 FS edit: FS edit: 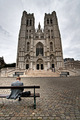
Message edited by author 2008-08-08 12:21:45. |
|
|
|
08/13/2008 12:21:50 PM · #25 |
Red Talied Hawk
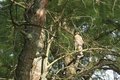 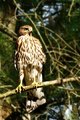
PP in Gimp
Crop a lot
Clone/Heal/Smudge all of the branches that cut accross the hawk. Created lots of feathers in those areas.
Select Bird's head and put on a layer, levels, curves, USM
Select Bird's body and put on a layer, levels, curves, USM
On background layer guassian blur to simulate some DOF.
Lots of dodge, burn, clone, heal on the main branch to get the DOF to look "real"
|
|
Home -
Challenges -
Community -
League -
Photos -
Cameras -
Lenses -
Learn -
Help -
Terms of Use -
Privacy -
Top ^
DPChallenge, and website content and design, Copyright © 2001-2026 Challenging Technologies, LLC.
All digital photo copyrights belong to the photographers and may not be used without permission.
Current Server Time: 08/01/2026 06:27:36 AM EDT.


