|
| Author | Thread |
|
|
02/17/2009 08:08:21 PM · #1 |
I'm really diggin HDRI photography. Not only is it beneficial for use in Maya (CGI) at the office, but for my personal photography as well. Thing is, I'm really struggling to get the hang of things. I've read numerous tuts on HDR in Photoshop (and Photomatix) but the final adjustment process seems to escape me with every shot I take.
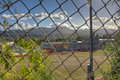
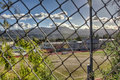
I just took 3 quick shots in the parking lot. Ignoring the chain link fence (obviously not ideal), I've got shots at +2 ev, 0 and -2 ev. What I'd like to see out of the image is a deep blue sky (from the darkest of the three images, with the richness of the green from the middle or lighter images and to pull the details from the shadows in the bushes.


Can anyone gimme any pointers as to how to adjust the toning histo and curves in the local adaptation conversion method? I can tweak forever and a day, but I really don't know how the curves relate to what I envision to be the final outcome. I'm no 'shop noob, but I feel like a total dunce on this.
Help? I know these are low res JPGs, but my sources are Canon Raw CR2 files. I'm using the Camera Raw tool from Bridge to sync the white balance and such, and PS CS4's HDR Conversion method. |
|
|
|
02/17/2009 08:26:47 PM · #2 |
tutorial may help
and also here.
Maybe these can help answer your questions.
|
|
|
|
02/17/2009 08:32:41 PM · #3 |
| Here's a good tutorial on how to avoid the common HDR mistakes. |
|
|
|
02/17/2009 08:37:48 PM · #4 |
You mean something like this?
That's photomatix pro, with a little further tweaking in CS3 in saturation and a touch of shadow/highlight.
Here's the above with a jolt of Topaz Adjust "clarity" preset added. It doesn't work very well at such a low resolution, noisy as hell, but can be useful on a full original.
Your originals are spread too far apart, and anyway the program works better from RAW or TIFF than from JPG. If you really NEED +2 and -2, then you need at least 5 exposures, to include +/-1 as well; photomatix is having to extrapolate over too large a spread with these originals.
In my experience, Photoshop's version of HDRI is totally inadequate. If you're serious about it, you need a better tool.
R.
|
|
|
|
02/17/2009 09:52:37 PM · #5 |
Thanks for the extra tuts guys, I'll read through em.
Bear, those came out considerably more like I wanted. Like you said, the low rez stuff doesn't as well, but even still they look better. You mention the exposure is too far spread, so did I misread that its better to have a wide spread? It's easier for me to shoot in either +1 0 -1 or +2 0 -2. I suppose I could setup a 5 shot exposure, just not automatic on my Rebel. For the moment I'm limited in that I only have PS CS4 to work with (never thought I'd say Photoshop was limiting) and I've seen some excellent work in this area done only with it, which prompted my question on curve adjustments. |
|
|
|
02/17/2009 11:45:19 PM · #6 |
Originally posted by jedi:
You mention the exposure is too far spread, so did I misread that its better to have a wide spread? It's easier for me to shoot in either +1 0 -1 or +2 0 -2. I suppose I could setup a 5 shot exposure, just not automatic on my Rebel. |
Here's a quick tutorial on the zone system:
A middle gray is Zone V. A dark-but detailed gray is Zone IV. A light but detailed gray is Zone VI. A near-black with traces of detail is Zone III. A near-white with traces of detail is Zone VII. II and below, VIII and above, have nothing in them, for all practical purposes.
Count 'em up: 3,4,5,6,7: you have basically a 5-stop range in which you have to compress all your detail, and a 7-stop range between pure black and pure white.
So IF you could go right up to subject and meter areas of even tonality precisely, let's see this little scenario: you're shooting a whitewashed old church in direct sunlight, and you can see one lit side and one full-shadow side. The church is clad in clapboards, so it has a lot of detail that you need to bring out. Meanwhile, there is stuff in the windows that you want to make out, but they are otherwise black empty holes for you.
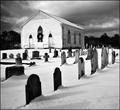 (kinda like this, except the controlling bright tones were the snow) (kinda like this, except the controlling bright tones were the snow)
So you meter the white side of the church, and the meter gives you a reading of, let's say, f/11 at 1/500.
Now, that reading, if you follow it, will give you a GRAY rendition of the white wall, because the meter assumes it is pointed at something of Zone V gray reflectance. So you need to adjust mentally: to "place" wall on Zone VII, which is where you want it, the exposure should be two stops MORE than indicated, which translates into f/11 at 1/125.
With me so far?
Then you meter the shaded side of the church, which you want on Zone IV, and it gives you, let's say, f/11 at 1/30. That's your Zone V exposure, and you want less than that by 1 stop, so you figure f/11 at 1/60 is the correct exposure for the shaded wall of the church.
So immediately you see that the the correct exposure for the shade overexposes the bright wall, and the correct exposure for the bright wall underexposes the shade.
Now you check out the window, and you find that your Zone III exposure for the window detail (metered exposure minus two stops) is f/11 at 1/60.
So this is a simple problem, you have a tonal range that's one stop too contrasty for what you want to do. So you make 3 exposures: one at f/11 and 1/125, one at f/11 at 1/90, and one at f/11 and 1/60. You now have an exposure that places the brights, another that places the darks, and one that splits the difference. And you merge them, and you now have a full tonal range in the merged image, with nothing too dark and nothing too light.
If you have a greater range, say a two-stop excess, you can do a -1, a 0, and a +1 or, if you want to be very precise, you can do 5 exposures and nail the half-stops as well.
With a three-stop excess, you run half-stop increments from + 1 1/2 to - 1 1/2, 7 exposures. In general, any time your spread is MORE than a stop between exposures, HDR is going to be problematic.
Now, in real life you need to eyeball this basically, unless you have a camera that has TTL spot-metering capability or a hand-held spot meter. But this is digital, and "film" is cheap right? So you can just rack off a whole BUNCH of exposures at half-stop increments and then choose the ones you need to use later, so it's not a biggie.
But here's the key thing: if you include in your merge images that are either brighter or darker than the brightest/darkest rendering you want in the finished product of the respective areas, your HDRI will get worse, not better. It will be too flat. Your brightest exposure in the merge will be the one that makes your dark areas look right, and your darkest exposure in the merge will be the one that makes the bright areas look right. Any exposure outside those extremes should not be used.
Hopefully, this will help you get headed in the right direction with your conceptualizing. Good HDRI, like good Zone System, requires previsualization at the time of exposure for best results.
R.
Message edited by author 2009-02-18 08:52:31.
|
|

|
|
Current Server Time: 03/16/2025 03:16:52 PM  |
Home -
Challenges -
Community -
League -
Photos -
Cameras -
Lenses -
Learn -
Help -
Terms of Use -
Privacy -
Top ^
DPChallenge, and website content and design, Copyright © 2001-2025 Challenging Technologies, LLC.
All digital photo copyrights belong to the photographers and may not be used without permission.
Current Server Time: 03/16/2025 03:16:52 PM EDT.
|


