Awesome! Thanks for the step by step! If you don't mind I'd like to play around with your picture and see if I can come up with something intriguing. I just found this one incredibly cool. I don't know much about blend modes so maybe this will help me learn some!
Play away. As with all jpegs, this is low res and you may see significant differences than what I achieved from the original RAW file, but you'll get a feel for it.
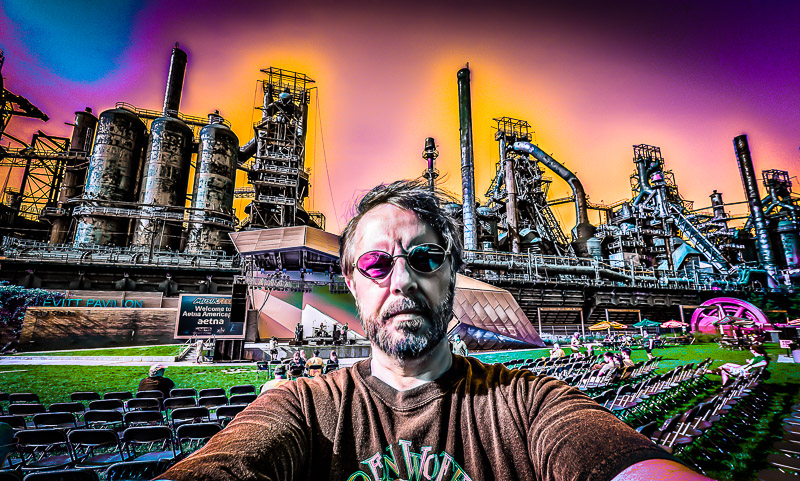
THIS IS FABULOUS! Like something out of the 70's. I love it!
Too bad you couldn't have entered this. You must show me your tricks as to how you accomplished this. Very cool.
Here's what I did to the best of my recollection. Took the original here... and did the following...
In Photoshop:
1. B&W conversion into a new layer, changed blend mode to Difference.
2. Applied Levels adjustment to brighten and created a new layer from visible layers.
3. Cloned B&W layer from layer 2, brought it above the current layer and changed the layer blend mode to Vivid Light and adjusted the blend opacity until I liked what I saw.
4. Applied Levels adjustment and created a new layer from visible layers.
5. Cloned background layer and brought it to the top and changed the blend mode to Luminosity. Played with Opacity until I liked what I saw.
6. Tweaked color saturation and other basic light adjustments and saved back to Lightroom.
Here's where it all is still a mystery to me, but I think I figured it out. I liked it at this point, so in order not to lose the original I made a virtual copy in LR and started applying the LR presets I have. I would apply one and if I didn't like it I'd undo it. I applied two presets, the first called "Arkham" and the second "Gritty-Heavy" via this method and voila!! Nothing intentional, just luck and the willingness to try. No recollection whatsoever as to where I got the presets.
Now here's the thing, none of this was planned, outside of the first step in Photoshop. I often will use a B&W conversion layer with a Luminosity blend mode to get a cool effect on a color image, but this time I just started flipping through all the modes and BAM. It wasn't immediately obvious as the result of the Difference blend was originally very dark, but after the Levels adjustment I knew I was onto something. The rest was all just trial and error and dumb luck/persistence.
There are some fascinating things that can be done simply with blend modes, and they're never the same on two separate photos. So if you tried the same steps on a similar photo it likely would look nothing like this. I'm still so pleased at the way my sunglasses took on an old school 3D look. I liked this so much that it now runs along the edge of my business cards. It eases people into the IR shots that I have. LOL
Awesome! Thanks for the step by step! If you don't mind I'd like to play around with your picture and see if I can come up with something intriguing. I just found this one incredibly cool. I don't know much about blend modes so maybe this will help me learn some!
THIS IS FABULOUS! Like something out of the 70's. I love it!
Too bad you couldn't have entered this. You must show me your tricks as to how you accomplished this. Very cool.
Here's what I did to the best of my recollection. Took the original here... and did the following...
In Photoshop:
1. B&W conversion into a new layer, changed blend mode to Difference.
2. Applied Levels adjustment to brighten and created a new layer from visible layers.
3. Cloned B&W layer from layer 2, brought it above the current layer and changed the layer blend mode to Vivid Light and adjusted the blend opacity until I liked what I saw.
4. Applied Levels adjustment and created a new layer from visible layers.
5. Cloned background layer and brought it to the top and changed the blend mode to Luminosity. Played with Opacity until I liked what I saw.
6. Tweaked color saturation and other basic light adjustments and saved back to Lightroom.
Here's where it all is still a mystery to me, but I think I figured it out. I liked it at this point, so in order not to lose the original I made a virtual copy in LR and started applying the LR presets I have. I would apply one and if I didn't like it I'd undo it. I applied two presets, the first called "Arkham" and the second "Gritty-Heavy" via this method and voila!! Nothing intentional, just luck and the willingness to try. No recollection whatsoever as to where I got the presets.
Now here's the thing, none of this was planned, outside of the first step in Photoshop. I often will use a B&W conversion layer with a Luminosity blend mode to get a cool effect on a color image, but this time I just started flipping through all the modes and BAM. It wasn't immediately obvious as the result of the Difference blend was originally very dark, but after the Levels adjustment I knew I was onto something. The rest was all just trial and error and dumb luck/persistence.
There are some fascinating things that can be done simply with blend modes, and they're never the same on two separate photos. So if you tried the same steps on a similar photo it likely would look nothing like this. I'm still so pleased at the way my sunglasses took on an old school 3D look. I liked this so much that it now runs along the edge of my business cards. It eases people into the IR shots that I have. LOL