| Photograph Information |
Photographer's Comments |
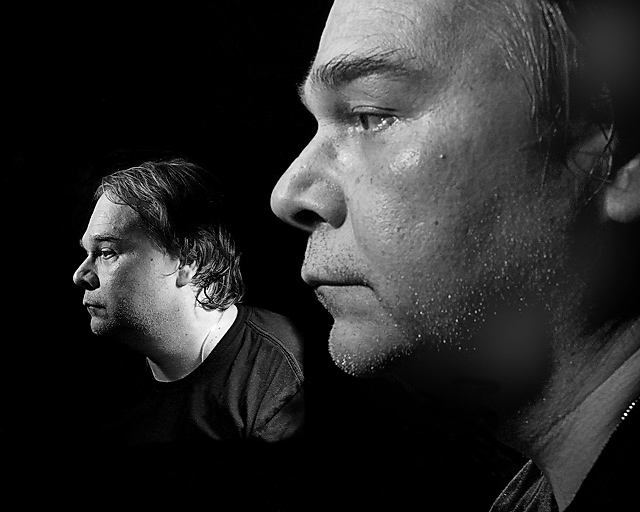
Challenge: Self Portrait VI (Advanced Editing V*)
Camera: Nikon D70s
Lens: Nikon AF-S DX Zoom-Nikkor 18-70mm f/3.5-4.5G IF-ED
Location: Philadelphia, PA
Date: Dec 3, 2007
Aperture: f/ 16
ISO: 200
Shutter: 1/8 sec.
Galleries: Black and White, Self Portrait
Date Uploaded: Dec 4, 2007
|
I wanted to try something different and got stuck on this idea of having an image with a reflection as well as not. I built a sort of a dark light tent around my shooting area by hanging more black velvet and a dark blue airline blanket around the perimeter of the shooting area. I put a box at the right rear corner of the shooting area under the velvet and set the mirror on top of it. The camera was on tripod, with cable remote at the front left corner. Composition and focus were pretty much blind as I have no one to help me set this up. Pretty much shoot and review. Another problem was having the cover of the clamp lamp and light appear in the mirror and on the right side and also at right side of my head. This called for repositioning lights, the number of them (started with 3 and went to 2) and repositioning the mirror. About 2/3 of the way through the shoot I got something I liked position wise but my eyes were closed. Yeesh. So I kept at it and got this in the last half dozen of the shots I took.
There is a dual meaning in the reflection part of this. Stopped working on Friday as the trillion dollar company I worked for closed the office. Not a clue what I am going to be doing but I am laying low for now. It's a bit daunting these transitions and I really do not want to take so many steps backward as I have in the past. Good luck with that. We'll see what happens.
I processed this twice, well almost. I stopped the second midway through as it was more or less turning out the same despite the processed used. I converted the raw file twice in PSElements 3.0, one as is and one with a +2.0 exposure compensation. I combined the lighter on top of the lower in luminosity blend mode at 100%. The other try was combining the two in Highlights and Shadows in Photomatix Basic. I did on this, layer adjustmenets for levels, brightness/contrast and hue/saturation. Another layer of hue/saturation colorized to black and white. Another layer each of levels and brightness/contrast. Another layer of hue/saturation colorized black and white (though I'm not sure why). Spot editing: Dust on the mirror, powedered my nose in the non-reflective image also a bruise from my glasses on my nose. Cloned out the edges of the mirror and more dust and marks on the black velvet in the background. Burned the lower right corner of the reflective image to round it out a bit. Crop. Sharpen. Resize. Sharpen.
OK so I went to choir rehearsal, Messiah at the Kimmel on Friday....drop by! LOL. While there I was analyzing the shot and thought I did not like the burn out I got on my neck in the above version. So I scrapped it and started over.
I had save the converted raw originals at 0 and +2 exposure compensations and used the same method to blend them as noted above. This time did some cloning in around the mirror first, cleaning spots on the mirror and losing the bright edge of the mirror. Also some hot pixels on the reflected shirt. I then did a layer mask of the non-reflected me and processed each individually with layer adjustments for levels, brightness/contrast and hue/saturation. This time I noticed that the reflected me had better coloring than the real. So I did a remove color cast on each. That did not help too much. I did layer on each with selective color bumping the yellows on the real me and toning the yellows done in the reflected me. That got the coloring a bit more consistent. Did another layer of hue/saturation on the entire image converting to grey scale and then a layer each for levels and brightness/contrast. The blowout on the reflected me was less but the real me was a gray mass. I did another layer mask on the real me and did a curves adjustment on each. That made both a bit more dynamic. Sharpened then did some more spot editing of hot pixels on the black backfround. Also a zit on the reflected me and some dodging and burning on both. Further buring around the reflected me, especially the shirt which was brighter than I like. Then duped the entire image and did a low pass at 7.8 and USM at 7.8 pixels. That gave a lot of detail that I liked on the real me. Merged the layer down in a soft light blending mode. Check for me hot pixels and cloned them out. Crop. Resize. Sharpen. |
| Author | Thread |
|
|
12/12/2007 10:34:57 AM |
So that's the face behind all those amazing flowers and abstract photos :) Nice to see you!!!
Oh. . . and great portrait too! |
|
 Photographer found comment helpful. Photographer found comment helpful. |
Comments Made During the Challenge  |
|
|
12/10/2007 02:27:50 AM |
| Wow, nice lighting. You have quite the expression on your face! I'm sorry for laughing. BB |
|
| Photographer found comment helpful. |
|
|
12/09/2007 11:01:20 AM |
| Without the special effect, this would have been a very good photo. With it, I don't know, I don't like it. But, this is a self portrait, so you are presenting yourself, and special effects might be your thing, but I'm not convinced. Good control of light. |
|
| Photographer found comment helpful. |
|
|
12/07/2007 11:27:12 PM |
| An interesting idea, unique. Technically nice, but I don’t know about DOF, I either would prefer to see both faces very sharp, or face on front more blur. Overall a very cool portrait photo :) |
|
| Photographer found comment helpful. |
|
|
12/06/2007 11:49:19 PM |
|
| Photographer found comment helpful. |
|
|
12/06/2007 10:11:34 AM |
|
| Photographer found comment helpful. |
|
|
12/06/2007 09:04:16 AM |
| Would have been really cool if the back image was looking at us -- I love the lighting! |
|
| Photographer found comment helpful. |
|
|
12/05/2007 07:20:23 PM |
| You have a funky soft area on your neck in the closer image..not sure what that's about.. I prefer the mirrored image better |
|
| Photographer found comment helpful. |
|
|
12/05/2007 03:51:06 PM |
| Terrific! Very nicely done. |
|
| Photographer found comment helpful. |
|
|
12/05/2007 03:08:31 PM |
| I'm not sure why, but to me it looks like there are two big gray spots on this picture. One on your neck, and one in the upper right corner which are very distracting. Great idea though! |
|
| Photographer found comment helpful. |
|
|
12/05/2007 01:37:54 PM |
| Nice shot , whats the softened spot on ur jaw line and hair? super idea |
|
| Photographer found comment helpful. |
|
|
12/05/2007 12:17:34 PM |
| I like your idea here. Very creative, great lighting and composition. Nice work. |
|
| Photographer found comment helpful. |
|
|
12/05/2007 01:29:26 AM |
| This is really neat, good focus |
|
| Photographer found comment helpful. |
Home -
Challenges -
Community -
League -
Photos -
Cameras -
Lenses -
Learn -
Help -
Terms of Use -
Privacy -
Top ^
DPChallenge, and website content and design, Copyright © 2001-2025 Challenging Technologies, LLC.
All digital photo copyrights belong to the photographers and may not be used without permission.
Current Server Time: 03/14/2025 10:28:59 PM EDT.