| Photograph Information |
Photographer's Comments |
Date Uploaded: Jun 12, 2008
Viewed: 355
Comments: 7
Favorites: 3 (view)
|
I will list processing steps tomorrow. LOL
Okay, it's tomorrow.
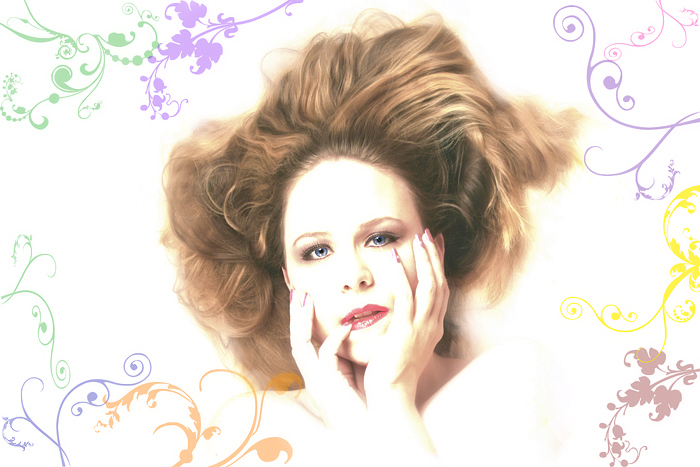
I began by creating a new file with a white bg in ps at the same size of my original photo.
I then made 9 blank layers.
On each layer I stamped a floral swirl in a different colour then went back and positioned them and sized/reshaped/rotated them with the transform tool.
I cropped me out of the other photo leaving a lot of extra stuff around me and using the move tool, did a click and drag and moved me to the new photo.
I then used the layer tool and sent me to the back layer.
I used the eraser tool at 100%, 100% very soft edge and erased everything that I wanted to remove (thinking back, I am pretty sure I should have removed that blob of hair on the right).
Then, on that layer, I increased the contrast and brightness until I had the right look on the skin.
I also went to hue/sat and desaturated the reds and yellows a bit.
I then took my eraser again set to 24%, 24% and blended a little here and there.
Reduced the brush to 12%, 16% and blended some more.
I used the transform tool and rotated my head to match better with the floral prints.
I used another blank layer and coloured back in the eyes with the blending mode set to colour and a very soft brush set at 100%, 100% and the colour sampled from the eye. Reduced opacity to 24% and used the eraser to clean up the edges.
I did the same thing as above for the lips.
Finally, I flattened the image.
USM at 200, 2.5, 2
Set History brush back to the flattened image and went over everything but my face.
Resized
USM at 50, 0.5, 0
History brush set to resize again on everything but my face.
I think that's it, if you have any ?s feel free to ask :) |
| Author | Thread |
|
|
06/17/2008 09:18:59 PM |
| I love this - a new favorite for me. I love that the shot is fanciful and dreamy.. inspires me to think about going further and and makeing a shot extra special. |
|
 Photographer found comment helpful. Photographer found comment helpful. |
|
|
06/15/2008 02:28:50 PM |
| What a beautiful edit, a new fav! Very cute image to start with, but you've taken it over the top with the high-key effect and colorful, whimsical designs! Just marvelous!!!! |
|
| Photographer found comment helpful. |
|
|
06/15/2008 06:57:08 AM |
| bloody brilliant .. i love wot you've done with the brushes and how you've processed your face .. its really a work of art .. i'd take my hat off to you if i wore one .. !!..:) |
|
| Photographer found comment helpful. |
|
|
06/14/2008 08:05:22 AM |
| This is frickin amazing...everything from the effects to her pose.. really awesome!!! |
|
| Photographer found comment helpful. |
|
|
06/13/2008 08:59:46 PM |
| Steps are fantastic (did you take notes as you went or what?). great image. the high key almost makes your face look like a mask. eyes are super sharp. nice work. |
|
| Photographer found comment helpful. |
|
|
06/13/2008 07:06:18 PM |
you should check out psdtuts.com. its my personal favorite photoshop tutorial site on the web and they have TONS of graphic design stuff like this--they also have their own flickr group worth checking out too.
Nice work here. I'd only say to use a mask instead of eraser--its non destructive that way and easier to get back mistakes. |
|
| Photographer found comment helpful. |
|
|
06/13/2008 05:38:32 PM |
WOWEE- first of all- you are a GLAM QUEEN !!!! I'm thinking you must have been a model at some point ...
Second- the editing is more than amazing- I read the steps till I got dizzy , then just admired the result :) |
|
| Photographer found comment helpful. |
Home -
Challenges -
Community -
League -
Photos -
Cameras -
Lenses -
Learn -
Help -
Terms of Use -
Privacy -
Top ^
DPChallenge, and website content and design, Copyright © 2001-2025 Challenging Technologies, LLC.
All digital photo copyrights belong to the photographers and may not be used without permission.
Current Server Time: 03/14/2025 04:08:34 AM EDT.