| Photograph Information |
Photographer's Comments |
Date Uploaded: Jun 28, 2008
Viewed: 238
Comments: 2
Favorites: 0
|
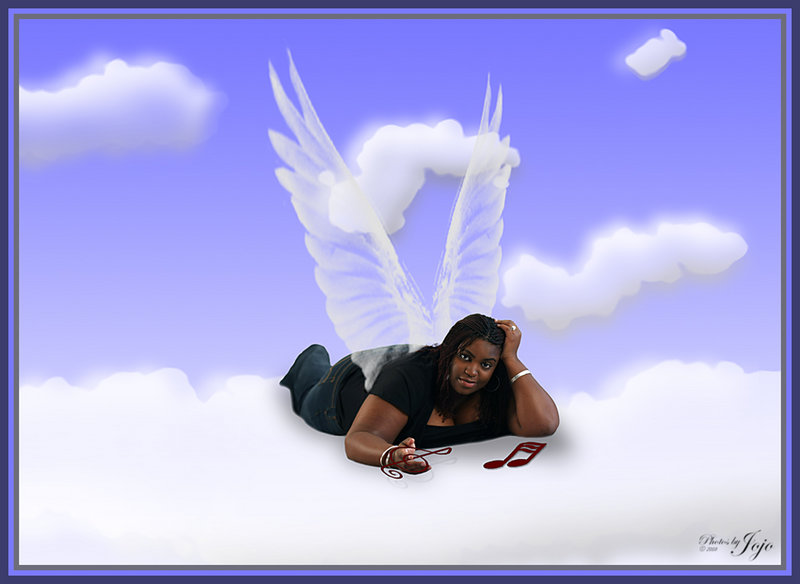
Extracted from the other photo with the extraction tool in CS3, made new document same size and put into a new layer.
Made BG bigger for impact by expanding canvas size height-wize.
Made a new layer under Dese and applied a gradient from foreground to background (which I had set to light blue and white).
The clouds were painted in with 3 layers and a wet media brush. All under Dese. All were done in white, then copied 2x. I erased a lot of the first one on the bottom, applied blur and moved slightly. Erased a lot of the second one, applied blur and a colour overlay in gray and moved slightly the other way. Adjusted opacity on all 3 layers until I had the effect I wanted.
The bottom cloud had a gradient applied to it so it would look a bit more substantial ;)
Used a wing brush on layers above Dese to make the wings and transformed them until I had them where I wanted them and they looked about right. Masked out a lot of the bottom parts to fit around Dese. Copied the layer 3 times, locked the transparet pixels on the copies and painted over them with 2 different shades of gray, one on each layer. Adjusted opacity until I was happy :)
Back to Dese. I transformed her to fit in the snuggly place in the clouds and sized her down a bit. I had to clone rather extensivly on the hand (you can tell if you look closely) to repair the removal of the pen. Added a layer mask and using a very soft LARGE brush (~10%), went all around her where she was touching the cloud. Changed to a 50% hardness brush and with my wacom traced around the back of her and her feet/hair with black.
Copied her layer and adjusted the levels allll the way black. Applied a LOT of blur and moved it down to make the shadow. Changed blending mode to soft light and masked out anywhere it was sticking out behind her.
At this point, I applied all masks after zooming WAY in and making sure it was all good.
On a new layer I used some brushes I made of various music notes and applied the treble clef. Transformed to take the place of the pen (because she had to look like she was doing SOMETHING with that hand lol) and added a 2px stroke in black and a drop shadow with a pretty high distance.
On another layer, I brushed in the other music note and again transformed and applied a stroke to match the first.
Saved as PSD
A few light tweaks here and there, flattened, sized for DPC, applied canvas size for white, blue and dark blue borders. Applied logo brush. SFW :)
I hope you enjoy!! |
Home -
Challenges -
Community -
League -
Photos -
Cameras -
Lenses -
Learn -
Help -
Terms of Use -
Privacy -
Top ^
DPChallenge, and website content and design, Copyright © 2001-2025 Challenging Technologies, LLC.
All digital photo copyrights belong to the photographers and may not be used without permission.
Current Server Time: 03/14/2025 01:37:44 AM EDT.