Layer Masks
by KevinRiggsNote: This is a very vertical use of layers & layer masks but you ought to at least get the idea of how you can use them to edit sections of photos. Click any image to enlarge.
This is a quick step-by-step walkthrough of how to use layers and layer masks to edit images. I employ them when I�m editing portraits but the same functionality works regardless of the application. Take it for what its worth.
 |
One of the photos from a portrait session
Ahhhh, OK. An attractive subject. Nice tan, kinda cool lighting with the sun behind the subject and fill flash employed to bring out her features. We get the effects of rim lighting by putting her between the lens and the sun.
|
 |
Slightly different camera angle to make the scene more active.
Little editing done; mostly touching up skin blemishes and a quick Levels edit.
|
 |
A crop for effect (I wanted to emphasize the diagonals and get rid of some of the overblown sky).
I also edited to bring more color out in the skintones.
|
 |
I used NeatImage (could be NoiseNinja or even PS CS2 in your case) to provide a skin-blending blur. Due to the strong sunlight the effect may go overboard and give the impression of soft focus. I also lightened the face.
|
 |
One way to lighten an area without losing too much detail or making it stand out too much is to create a 2nd layer, apply a layer mask. Choose black (F6 brings up the color palette, click the top left color and type zeros for R,G and B values).
Use the PaintBucket ("G" in PhotoShop), to paint the whole mask black. To paint the whole layer black, just hold the paintbucket over any portion of the image and left-click. Now double-click the top left color swatch in the Color palette (hint � it�s the small black square on top of the white square) and type "255" for R, G and B values. At this point I hit F6 to get rid of the color palette (but I'm a freak about screen real estate and with my max resolution at 1280x1024, I'm dying with too many windows open). Use the "B" key in PhotoShop to select the Paintbrush. Make sure you have the black layer mask selected in the Layers window (F7 will bring up the Layers window if its not visible). The layer mask should have a double line around it to denote that its selected.
|
 |
Before we begin painting, let's make sure that we will be able to see a difference as we go. In the layer menu
let's set the Blend method to "Screen". Screen blending will cause any visible selection to brighten the image A LOT!
|
 |
To help mitigate the amount of brightening, lets set the Opacity down to around 30%.
|
 |
Now whatever we paint with the white paintbrush will start to appear lighter. Remember, though, we must paint only in the layer mask. See how the layer mask has double lines around it?
|
 |
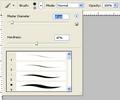
Now let's choose a brush tip that will keep our selection from standing out too much. The size of your brush tip TOTALLY depends on the resolution of your image. Because I've already cropped this image and I'm dealing with 1000x1400 pixels on my computer, I chose a brush tip with a master diameter of about 15 pixels. Perhaps more importantly I chose a hardness of around 50%. This way I get a softer edge to what I paint and since I want this to blend well I think the softer edge is better.
|
 |
Now we can actually begin the work that we wanted to start earlier. Let's lighten the face of our subject just a little. Start to paint around the edge of her face and follow her jawline until you've painted over her entire face.
To make my changes appear more evident I've upped my Opacity to over 60% (probably should have told you that earlier but don�t worry, I�m going to reduce it back to 30% before I�m finished with this since 60% is just too light).
You should notice that everywhere you've painted is visibly brighter. You also should notice that since we haven't applied any sharpening yet there is no loss of sharpness or clarity.
|
 |
Once you have the whole area painted in, you can adjust the level of brightness by adjusting the Opacity of the layer up or down (and here�s where personal taste takes the front seat - for me I usually like the blend effect around 25-35%).
|
This isn't the only way to lighten up a face or any other area of a photograph but its certainly one way that can produce results that are virtually unnoticeable to anyone except someone who's seen this step-by-step type of instruction and knows to look for the tell-tale signs of brightness. Most viewers of photographs expect the face to be brighter, if you underexpose by a little and then use this technique or a similar one to "help" the viewer see what they expect, you'd be surprised at how someone not versed in this style of editing will gladly take your edit for "face value" (I'm so sorry for the pun but its late).
Hope this helps and gives you some ideas or steps to try on some of your photographs.
Conversely, if you want to darken an area, simply set the Blend method to Multiply and paint your way to a darker tomorrow.
Home -
Challenges -
Community -
League -
Photos -
Cameras -
Lenses -
Learn -
Help -
Terms of Use -
Privacy -
Top ^
DPChallenge, and website content and design, Copyright © 2001-2026 Challenging Technologies, LLC.
All digital photo copyrights belong to the photographers and may not be used without permission.
Current Server Time: 04/26/2026 08:52:33 AM EDT.

