| This Tutorial |
Tutorial Viewed: 10295 times
Discussion: Click Here |
Tutorials Home
|
Creating Photoshop Actions by Nullix
Assumptions
There are some assumptions I have made in writing this tutorial.
|
You are using a PC Computer.
|
|
I am sure you will understand this tutorial if you are using a Mac,
but the keyboard commands will be the same. If you are using a Mac,
I am assuming your smart enough to figure out what the key command is.
|
| |
|
You have a version of Photoshop that allows for actions.
|
|
If you do not have a version of Photoshop that allows for actions,
there is not much you'll get out of this except for a yearning for
a better version. Of course, I think all versions of Photoshop have actions.
|
| |
|
You have a version of Bridge that will allow playing these actions.
|
|
I am using Photoshop CS2. If I remember correctly, Photoshop CS has
a kind of Bridge, but I don't remember. I do not remember if that
version allows for batching. This is not necessary for this tutorial.
|
Introduction
For every image I put up on my website, I insert a title,
copyright statement, and add a border. I donít actually
manually open each image and click and type, I have this
set as a series of actions that I run on all images.
This tutorial will show you how you can set up an action
for titles. Once you have it figured out, you can apply
it to other steps your have in your workflow. Hereís
what you will learn:
- How to create an action.
- How to modify that action.
- How to run the action on multiple images.
#1 Starting (Working with an image)
To start, we need an image to work on. Open an image. (If
you donít know how to open an image, youíll need a different
tutorial. In fact, you shouldnít be reading this in the first
place if you donít know how to open an image). Once you have
an image to work on, lets create an action.
Action Dialog Box
|
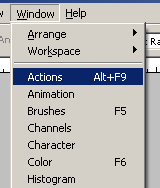
In the "Windows" menu there is "Actions" option.
Or you can hit the Alt key and F9 (Alt-F9). Then
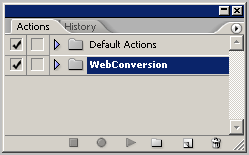
the Action dialog box will display.
|
|
|
|
|
On the bottom, the buttons are as follows:

|
|
Stop |

|
|
Record |

|
|
Play |

|
|
Create New Set |

|
|
Create New Action |

|
|
Delete |
#2 Creating a Set of actions
So lets start by creating a set of actions. On the Actions dialog box,
click on the "Create New Set" button ( ).
Then enter the set name "Web Conversions" for this tutorial. This way,
we can group actions together. ).
Then enter the set name "Web Conversions" for this tutorial. This way,
we can group actions together.
|
|

|
| |
|
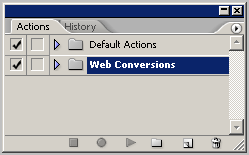
You will now see your set on the list.
|
|
|
#3 Create/Record an action
|
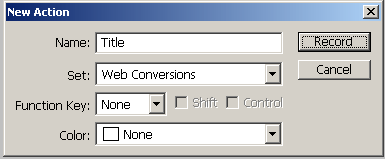
Now lets create an action in this set for adding title to an image by
clicking on the "Create New Action" button. Letís call this action "Title"
(making sure the set drop down box is on "Web Conversions") and then click
the Record button.
|
|
|
| |
At this point, youíre recording the action. If youíve ever worked with macro,
you itís the same thing. If you havenít worked with macros, basically,
everything you do in Photoshop is being recorded to this action.
Now, letís create a title (while the action is being recorded). Click on the
"Horizontal Type Tool"
|
|

|
| |
With the "Horizontal Type Tool" click on the area of your image you want your
title to appear. Then enter your title, "Day at the beach, Jan 27, 2007."
|
| |
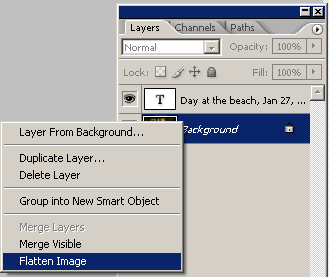
Once you have the title typed in, lets flatten the image.
|
|
|
| |
And stop the recording
( ). ).
|
#4 Congrats!!! (Editing your action)
Youíve created your first action. But wait! You have the date wrong, or itís next
week and you want to change the title.
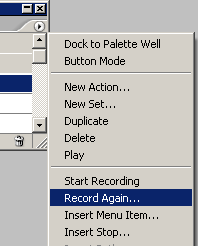
With the "Title" action highlighted, click on the arrow in the upper right corner
of the Actions Dialog box. And choose "Record again" from the menu. This option
allows you to record the action with the preset settings. Just change the title.
|
|
|
| |
#5 Running your action on multiple images
|
Now comes the powerful part of this section. You now need to run your action on more
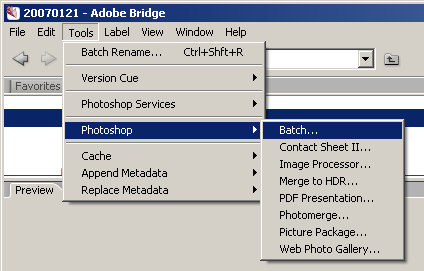
than one image. In Bridge, under Tools/Photoshop menu, there's an option of "Batch..."
With this "Batch..." you can run your action on the images you have seleted in Bridge.
|
|
|
| |
Ending Notes
Remember, anything your do while your recording an action, is saved. You can, save an
image as JPEG, close an image, flatten layers, run Curves, and so forth. Go wild!
Home -
Challenges -
Community -
League -
Photos -
Cameras -
Lenses -
Learn -
Help -
Terms of Use -
Privacy -
Top ^
DPChallenge, and website content and design, Copyright © 2001-2025 Challenging Technologies, LLC.
All digital photo copyrights belong to the photographers and may not be used without permission.
Current Server Time: 04/01/2025 03:35:19 PM EDT.
|
|

