| Author | Thread |
|
|
01/08/2011 01:38:42 AM · #51 |
Originally posted by atupdate:
Generally I have pretty good luck translating Photoshop tutorials into PSP terminology. I found a Photoshop tutorial on Luminus Landscape today that I think could be used instead of the tutorial I posted earlier in this thread.
I'm interested in the second method (Layer Mask method) of this tutorial. I initially thought using a mask from an image might get me there but I couldn't get to the result I was looking for.
Any help with this would be appreciated.
Tim |
Doh! I was going to say the only way to do similar (because we cannot drop an image on a mask) was to do a Mask from Image. Then I reread the post a saw that you tried that.
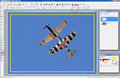
I tried anyway for fun, I didn't have two exposures (as in the tut) on hand so I:
Duped background layer twice. Used Screen blend on top layer (to over brigthen) merged it down on the copy of background.
Duped background layer again, moved it on top of the lightened layer.
On the Top Layer (darker one) did a New Mask from image... Source Luminance, Invert Mask data unchecked.
Used Soft Light blend on that top (masked) layer.
This actually did do a cool adjustment.
|
|
|
|
01/08/2011 10:18:51 AM · #52 |
Originally posted by awpollard:
Originally posted by atupdate:
Generally I have pretty good luck translating Photoshop tutorials into PSP terminology. I found a Photoshop tutorial on Luminus Landscape today that I think could be used instead of the tutorial I posted earlier in this thread.
I'm interested in the second method (Layer Mask method) of this tutorial. I initially thought using a mask from an image might get me there but I couldn't get to the result I was looking for.
Any help with this would be appreciated.
Tim |
Doh! I was going to say the only way to do similar (because we cannot drop an image on a mask) was to do a Mask from Image. Then I reread the post a saw that you tried that.
I tried anyway for fun, I didn't have two exposures (as in the tut) on hand so I:
Duped background layer twice. Used Screen blend on top layer (to over brigthen) merged it down on the copy of background.
Duped background layer again, moved it on top of the lightened layer.
On the Top Layer (darker one) did a New Mask from image... Source Luminance, Invert Mask data unchecked.
Used Soft Light blend on that top (masked) layer.
This actually did do a cool adjustment. |
I'll play with your method over the weekend. It is possible that I didn't have the bright image bright enough to bring out the shadow details enough. I may have to pull out the Raw image and play with a few different exposures.
Tim |
|
|
|
01/16/2011 09:24:31 PM · #53 |
Hasn't been a post here in a day or two. Here's one to play with:
I did up a real quick one on Effect > Edge Effect > High Pass. Lot's of fun as you can use it to Save soft shots, add some grunge or even lighten dark shots. I use it a lot to add punch to shots.
I put it in Journal format on my smugmug site here: //www.urgephotos.com/PaintShop-Photo-Pro-Tutorials/High-Pass-for-a-little-kick/15477841_DCPcK
I will refine the verbaige a bit.
Oh, the shot in the tut was taken with my $30 Diana+ (plastic) lens on the 5DmkII, which actually works too well (don't get that cool lomo effect) so I have to grunge them up a tad.
I went Extreme High Pass on this one from a local San Diego photo group GTG.

Message edited by author 2011-01-16 21:55:36. |
|
|
|
01/16/2011 10:11:23 PM · #54 |
Waving Hand like an idiot.....
I have PS3.... Can anyone tell me what and how and what is the proper use of the sponge tool????? got some neat effects from it but I really don't know what it's for or how to really use it.... |
|
|
|
01/16/2011 11:09:50 PM · #55 |
Originally posted by awpollard:
Hasn't been a post here in a day or two. Here's one to play with:
I did up a real quick one on Effect > Edge Effect > High Pass. Lot's of fun as you can use it to Save soft shots, add some grunge or even lighten dark shots. I use it a lot to add punch to shots.
|
Ya know as long as I have used PSP I have never noticed that before.... Im gonna have to play with the high pass thing.... (if i have it LOL)
|
|
|
|
01/22/2011 04:15:21 PM · #56 |
| OK, I've got a question. I'm using PSP 7. How do I make a border on the inside of the photo? I can't find an example right now, but I want the border several pixels into the photo, not around the edge. I can't figure out how to do it. |
|
|
|
01/22/2011 07:59:29 PM · #57 |
Originally posted by KarenNfld:
How do I make a border on the inside of the photo? I can't find an example right now, but I want the border several pixels into the photo, not around the edge. |
I'm sure there is a more precise way of doing it that will locate the border an exact number of pixels in, but here's how I just did one.
-Select the preset shape rectangle tool on the left side toolbar
-Set the foreground color to the desired color
-Set the background color to transparent
-Set the pixel width as desired
-Draw your rectangle, which will be created as a new vector layer
-flatten
Message edited by author 2011-01-22 20:00:20.
|
|
|
|
01/22/2011 09:15:23 PM · #58 |
In PSP7 there is no option to choose a foreground and background colour. I can get to the shape and draw a border inside the photo but I can only figure out how to use the style they have given, which means it's always black and I can't choose a colour.
Edit, never mind, I had to choose the colour from the colour palette.
Thanks, I can do it now!!
Message edited by author 2011-01-22 21:17:25. |
|
|
|
01/23/2011 12:21:09 AM · #59 |
Perhaps it's finally time to upgrade? You can get X1 for $5.95 (USD) from Purplus.
|
|
|
|
01/23/2011 09:10:00 AM · #60 |
Originally posted by Yo_Spiff:
Perhaps it's finally time to upgrade? You can get X1 for $5.95 (USD) from Purplus. |
It's not a matter of upgrading, I've tried other versions and I just didn't like them! I even tried PhotoShop and couldn't get the hang of it. I hate change. :) |
|
|
|
01/23/2011 08:07:32 PM · #61 |
Originally posted by Yo_Spiff:
Originally posted by KarenNfld:
How do I make a border on the inside of the photo? I can't find an example right now, but I want the border several pixels into the photo, not around the edge. |
I'm sure there is a more precise way of doing it that will locate the border an exact number of pixels in, but here's how I just did one.
-Select the preset shape rectangle tool on the left side toolbar
-Set the foreground color to the desired color
-Set the background color to transparent
-Set the pixel width as desired
-Draw your rectangle, which will be created as a new vector layer
-flatten
|
It is even easier if you turn the Snap to Grid and Grid feature on (Find it under View). This way the program helps center the rectangle. You can fine tune the grid size to put it right where you need it.
I use this feature for a vignette action I wrote.
Tim |
|
Home -
Challenges -
Community -
League -
Photos -
Cameras -
Lenses -
Learn -
Prints! -
Help -
Terms of Use -
Privacy -
Top ^
DPChallenge, and website content and design, Copyright © 2001-2024 Challenging Technologies, LLC.
All digital photo copyrights belong to the photographers and may not be used without permission.
Current Server Time: 04/27/2024 02:30:09 AM EDT.


